Figurative Modelling Part X

On the 12th of December, I presented my ten slide presentation based on my experience, skills and Ambitions, throughout my time in figurative modelling.

Each slide covered certain aspects:

  • New skills and techniques
  • My collage
  • My trip to the V&A
  • Relation to my own coursework
  • Research and context
  • New ideas

Screenshot 2019-12-16 at 23.02.28.png


Screenshot 2019-12-16 at 23.03.16.png

Heres the link to the full Presentation:

Final presentation

Figurative Modelling Part IX

On the 10th of December, I had my final practical session of Figurative modeling, For this, we were given a step by step process on how to make legs out of clay.

 First we were given paper templates to trace over the clay and cut out

After tracing and cutting the pieces I curved them and connected them with slip, securing them in place.

Once each pieces were made I then sculpted feet for both the legs, next I attached both the legs to each foot.

Finally I connected both the legs together, I was pretty happy with the result.


Figurative Modelling Part VIII

On the 5th of December, I had my eighth session in Figurative modeling, For this session, we showcased our ceramics, plaster, slip collages to Natasha, to express what our piece is about.

UNADJUSTEDNONRAW_thumb_14fd

As I mentioned in the last post about this, I hadn’t really planned the whole piece out and instead improvised, therefore my piece didn’t really have an intentional meaning, however since this term project was bout expressing, it was up for interpretation, so anyone could say what kind of story it tells.


Figurative Modelling Part VII

On the 3rd of December, I and my group went on a trip to the Victoria and Albert Museum in London.

During the first few hours of our time at the V&A, I went around looking at multiple artifacts and artwork from multiple countries and cultures.

IMG_9460    IMG_9478 IMG_9485

For the last hour of the day, we all met up and were introduced to the ceramic artist Aimee Lax,

Heres a link to my youtube video of my trip to the V&A

Figurative Modelling Part VI

 On the 28th of November, I had my 6th session in figurative modeling, today’s session was split into two parts, the morning half was a slideshow presentation about ceramic sculptures and the afternoon half was making a slip, wax, fabric, plaster colleague.

Ceramic presentation

For the first half of the day, we started off with a slideshow of ceramic pieces and what the artists were trying to represent in their work,

Here are some examples:

img_9334.jpeg

This Symbol of life and death

and Reflects loss

IMG_9336.jpeg                                                                   Donatello’s Mary Magdalene (1455)   

Wooden Sculpture


Ceramics Collage

For the second half of the day, we started making an art piece collage using most of our work projects from the past few weeks, while also adding extra materials to the piece such as leftover fabric, wire, and clothing, during this process we also were given the option to dip our models or materials into a bucket of liquid slip and even hot wax

When I was making mine, I just made it up as I went, adding layer upon layer of material, clothing, slip, and wax.

The general idea of this project was to sort of giving a visual representation of what our piece is about, In my case, I wasn’t fully sure where I was going with this, I think in future it would be best to plan it out step by step and even come up with an idea beforehand instead of “rushing into the action”, but in the end I was mildly happy with the end result, it looked interesting and looked as though it had a story, but still it would be best if I thought this through first, then the outcome would’ve been better.


Materials I used:

  • Face cloth
  • String
  • Needle and thread
  • Chicken wire
  • Pantyhose
  • Gloves
  • Miscellaneous fabric

UNADJUSTEDNONRAW_thumb_14fd s1KM06BRR1eYKOGvdivvAg_thumb_1500 IMG_9360IMG_9374


Heres a link to the video on my youtube channel that’ll show a little bit of the working progress.

Figurative Modelling Part V

On the 26th of November, I had my fifth Session in figurative modeling. This week’s exercises for life drawing and sculpting exercises.

Life Drawing:

Sketching

For life drawing, we did 10 of 10-second sketches, 10 of 20-second sketches, 5 of 1-minute sketches and 2 of 10-minute sketches.

IMG_9355

Life Sculpting

for the next part of life drawing we each took a lump of clay and did 2 of () minute sculptures of our model, after that, we did two of () minute life drawings of our models.

IMG_9301     UNADJUSTEDNONRAW_thumb_14df

Hand Sculpture

For the afternoon session, we sculpted hands, First, we took two lumps of clay and rolled them into bowl shapes, next using a bit slip to glue them together, this formed the base shape of the hand, next we took another lump each and sculpted the wrist.

img_9303.jpeg

Next, I rolled up bits of clay and formed the fingers, once all of them were attached, I started shaping the palm, the knuckles, the wrinkles, and the position, For the finishing touches, I covered most of it in white slip for the firing process.

img_9314.jpeg

Figurative Modelling Part III

On the 19th of November, I had my third session of figurative modeling, this weeks session was divided into four parts: Life drawing, study presentation, body parts sewing, and sculpting exercise.

Life drawing

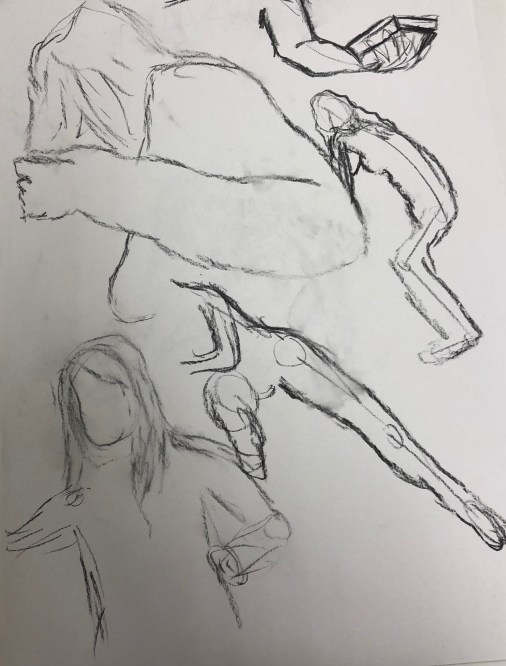
For life drawing, we did 10 of 10-second drawings, 10 of 20 Second drawings, five of one-minute drawings, (for each pose we were to only draw or shade in negative space around the outside of the figure) two of five-minute drawings (With more detailed exploration of form and softness conveyed through the details of lines) and to put two of the 10-minute drawings (for these we had to carefully consider the positioning of the figure into the piece of paper, showing what is expressed if the figures positioned.

During the middle of the session, I and my class experience three of three-minute exercises where we stand or sit still where the model was in order to get a sense of relation in court and possibly a sense of our bodies balance and even slight alteration


Stitching

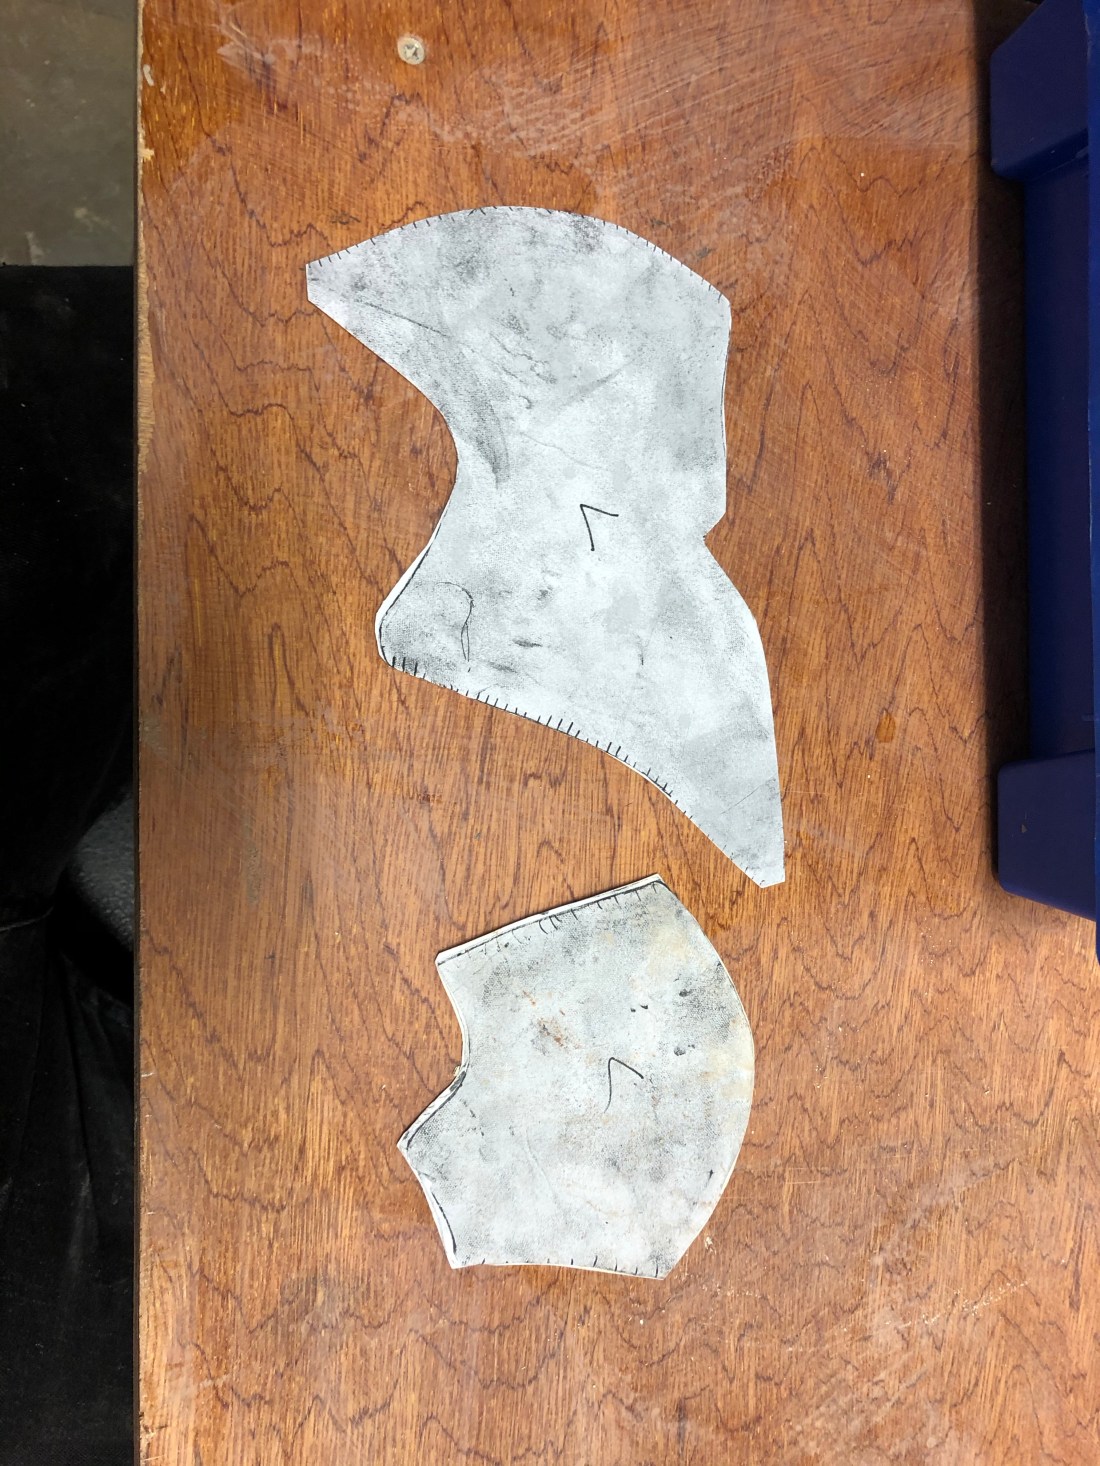
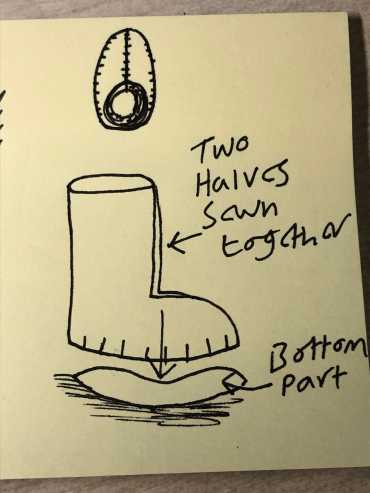
During the first half of the afternoon, I and my group continued our stitch work on fabric body parts, for this session, we made feet, I made two.

first I drew the outline of the lower part of my leg (1 centimeter thicker), I did this on a piece of fabric that was folded up, so once sewn together it would create the other half when cutting it out.

After that, I made a 3-dimensional one, for this, it had to be split into three parts, (The left half of the leg, the right half and the bottom foot) For the left and right halves, I did what I did for the first leg, except without sewing the bottom, then after that, I traced the bottom of my foot, (again, a centimeter thicker) next I had to cut small lines at the bottom of the main foot (this was so when I sew the main foot and the bottom together, I would be able to move certain parts around to help it stitch together), Once I sew it together, I went over a few areas to make it more secure, I was pretty happy with the end result.

IMG_9326.png


Sculpting exercise 

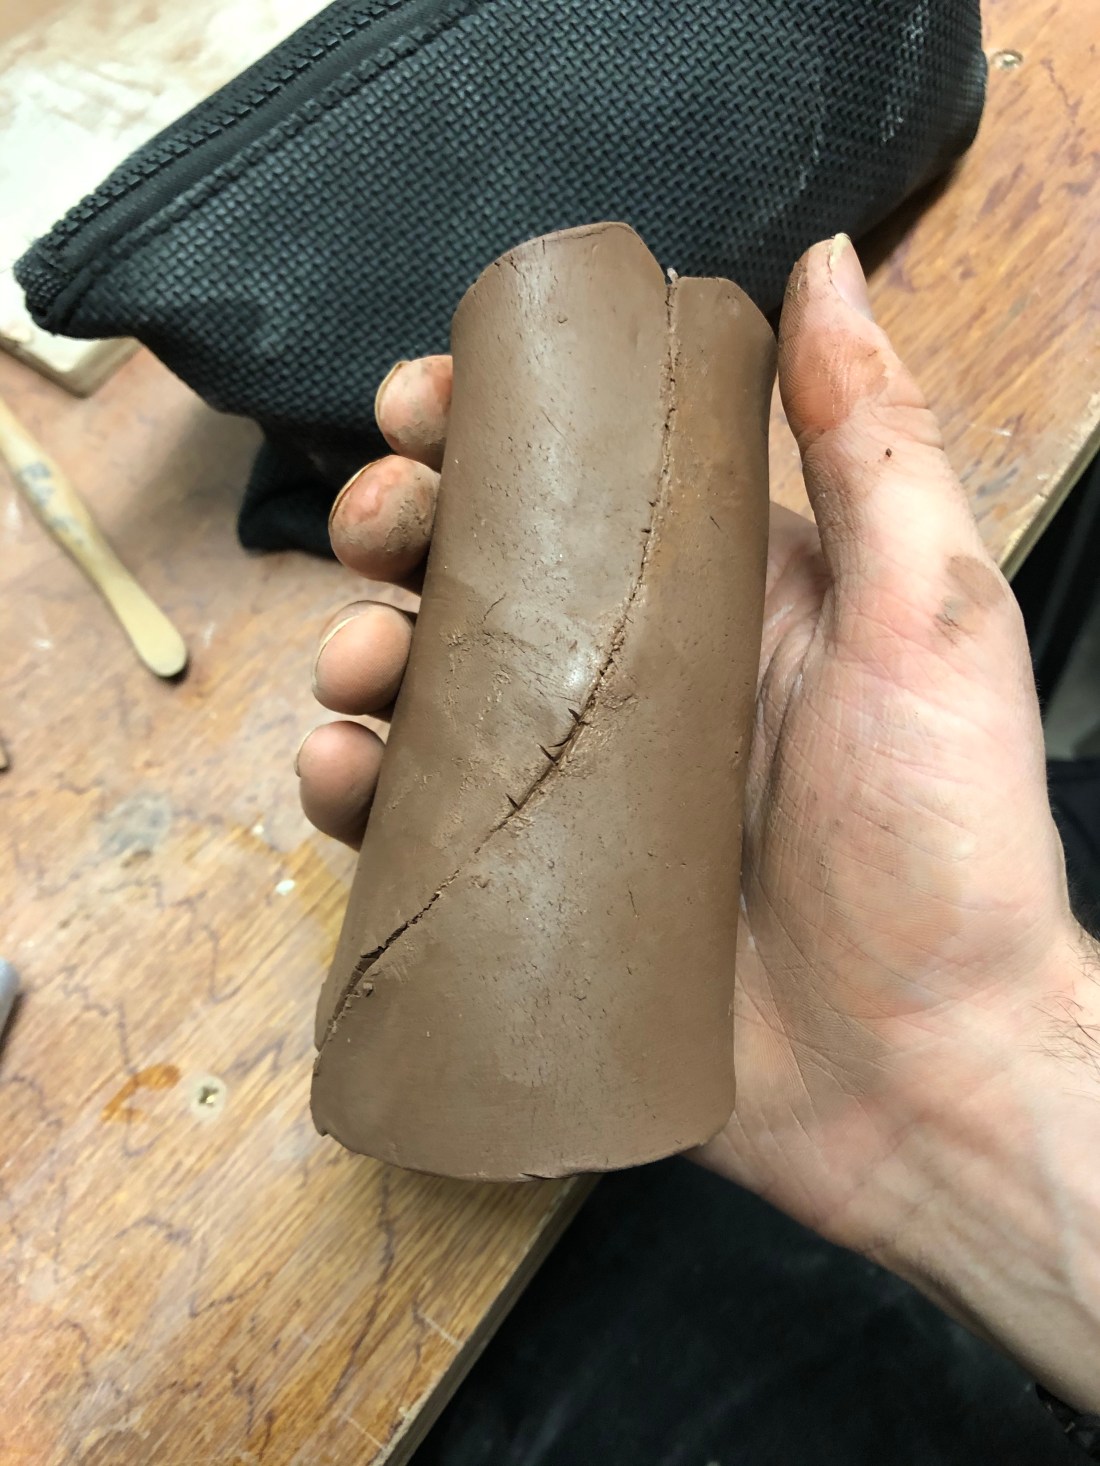
For the final exercise of the afternoon, I and my group were taught step by step on sculpting feet.

First, we took a lump of clay and started by sculpting the bases by making them into kidney shapes, then took another lump and placed it on top to create the ankle and smoothed it together, using the clay tools we drew two lines from the ankle, one leading to the big toe and the other leading to the pinky toe.

IMG_9323 

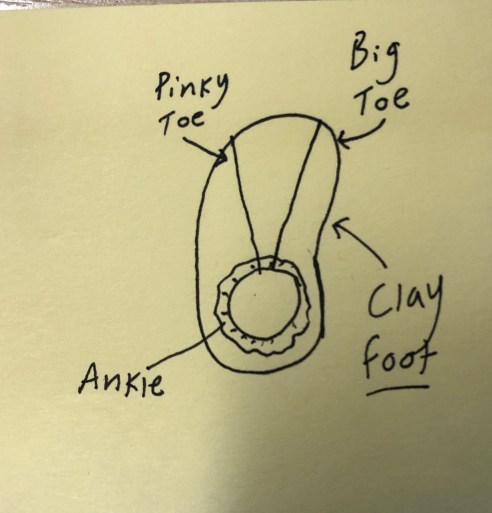
Once they were in position I started drawing out were the toes would be and then cut them in, after that, I then removed some excess clay around the toes and base to form the foot.

img_9325.jpeg

Once the shape of the foot was finished, I then added a few more details by trimming some areas, adding toenails and rougher texture to make it more life-like, In the end, I was happy with the result.

(Insert Finished pic here)

Figurative Modelling Part IV

On the 21st of November, I had my fourth session in Figurative Modelling, for today’s session we were split into two groups for a morning and afternoon session, These included slab building and plasterwork.

Slab Building

For our first exercise of the day, we were to  make a slab collages, each slab including an aspect from one of our life drawings, for this we were split into groups of three and each of us drew certain parts of our life drawing sketches, we also made separate clay body parts to add to our collage (I made the arm)

Note: The idea for each slab drawing was to give it a 3D aspect to make each piece stand out

Plaster Stitch

For the final exercise of the day, we took our fabric limbs from the last two weeks down to the plaster room, before filling the body parts with plaster, I had to figure out the equal amounts of water and plaster I had to mix together.

Arm

For the arm, I mixed 1 pint and a half of water along with 1125 grams of plaster, once they were both mixed together I waited about a minute for it to settle before pouring the mix,

Once it was ready I poured the mix in the arm while it was drying  I made sure the mix would spill by hold the top part in place

Also while the plaster was getting gooey I moved the fingers around to make a “finger gun” gesture.

Once it dried up, I was happy with the result.

unadjustednonraw_thumb_14e4.jpg

Foot

For the foot measurements, I mixed 2 and a half pints of water along with 1875 grams of plaster, once mixed together and after a minute of it settling, I then poured the mix in the fabric, while it was drying I kept hold of the top to prevent spillage.

The end result wasn’t what I was expecting since it was too chubby and uneven and starting leaking at the bottom as soon as I poured the mix in, so I had to place something on top of the hole to stop the spill.

unadjustednonraw_thumb_14e3.jpg


Figurative Modelling Part II

On the 14th of November, I had my second session of Figurative Modelling, for the whole day, I and my class were sculpting heads, first, we started with taking terracotta clay and building a circular wall to act as a base, then I started building up layers of clay, working my way up the head.

img_9020.jpg

Once I built my way up to the chin I took a small piece of clay to act as support once the chin was in place, then I started building more upward to the face, for the nose I tore up small pieces of clay that helped form the shape.

IMG_9024

(Note: During the process, we were encouraged not to make the surface of our heads too smooth as it would increase our chances of them collapsing)

While making my way to the top of the head (like what I did with the nose) I took small pieces of clay and started building my way up.

IMG_9031.jpg

Once I sculpted the eyes, ears, lips and other facial features, I was finished and satisfied

(Note: the reason why I didn’t fill the head all the way to the top was both because there was a risk of it collapsing and also because I liked the way it looked).

img_9052.jpg


Figurative Modeling Part I

On the 12th of November, I had my first class on figurative modelling, To prepare for our induction each of us was tasked in printing out an image of a figurative model art piece that interested us, For me, I chose the work of Michael Flynn.

Introduction

In the opening presentation, we were introduced to multiple figurative model artists such as Harry Alley, Christina Cordova, etc, next, we were told to analyze the art pieces by artists we chose using the three identities such as A particular way of thinking about the ideas, a particular way of finding relationships between ceramics and a particular way of presenting outcomes such as curation, installation or photography.

Sculpting exercises

For our first exercise of the day, we were given pieces of raku clay and use it to create our own multiple sculptures of the body that helped find the thinking, finding and presenting of sculpture work. These included parts of the body, the surface of the human skin and textures.

IMG_8978

Hand Stitch Part I 

For the first half of the afternoon, we made a start on making our fabric plaster hands, For this week we had to trace our arms (only a centimeter wider) on the fabric, place a few pins to secure it in place, then I proceeded to sew around the tracings, once it was sewn, I then cut the arm out.


Life Drawing

For the final exercise of the day, we had a few life drawing exercises, This included 10 of 10-second drawings (these included the core lines, gravity, and notation of the body), 10 of 20-second drawings, (these included core lines, the undulation of soft flesh, and punctuation of what it feels like to be in the body) 5 of 1 minute drawings (these included core lines, softness and a different area of focus) and finally two five minute drawings (for each drawing, I had to focus on different areas of the body and to carefully consider the relationship between skeletal structure and skin qualities that surround it).


A few of my sketches:


Five Minutes                                        20 Seconds

img_8999-e1573665234507.jpeg    img_8997.jpeg

1 Minute

img_8998.jpeg