Glass Work Shop (26/2/19)

On the 26th of February, I started glass workshop

First I was given a tutorial on how to cut, sand, clean and glue the glass, once I was given the instructions I needed I started making my model, a glass hand.

First I drew out each piece in my notebook.

img_5791.jpg


IMG_5632 2.JPGNext, I took the glass and drew the right measurements of each piece on the glass then  using a glass cutter I cut out each piece and arranged them in the right order, next I took some thin wire, cut it and used it to create the details in the fingers and thumb and using glass glue to secure them, next I cut more pieces of glass identical to the original pieces and glued them on top, once they were fired in the kiln I was able to hook the fingers on the hand. I was happy with the end result.


Aluminum Casting (12/2/19-13/3/19)

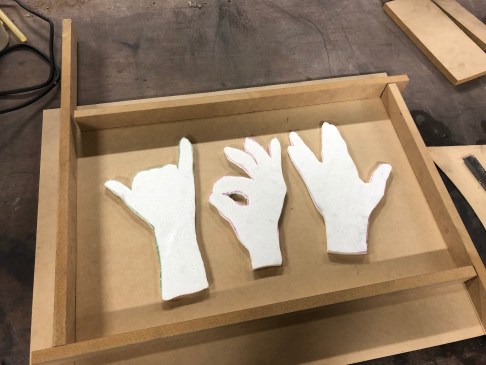
On the 12th of February, I started aluminum casting. First I was given a tutorial on how to create sand molds. Before casting I had to measure the object I was casting,(I cast both my polystyrene and foam-core poster board hands)

img_5545.jpg

Next, I had to create borders to surround the object and hot glue them in place, next I had to create the sand, for this I had to mix 700g of silicate binder and 14kg of silica sand and mix them using a mixer, once I mixed it just right I poured the mix into a container,

Next, I started filling in the borders with sand, once it was completely covered I had to make sure the top was completely flat.

IMG_5648.JPG

Next, I used a tank of co2 to make the sand solid and even poked holes in so it can surround the inside, then using a coin I carved in small circles on two edges to prepare for the next pieces, I also created a smaller sand mold, this one was for to pour the metal into, by building a smaller border and a plastic cup I was able to create a smaller mold to glue to the top

Next, I flipped the pieces onto the other side and covered them with sand and sprayed co2 on them, next I took both pieces, covered them in graphite and lit them on fire.IMG_5653.JPG

Next came the pouring to do this we had to heat up the aluminum and wait until it got to 1200 degrees, then I gently and quickly poured the metal into my molds and waited for them to cool down.

Finally, the day came for me to break the hands out of the molds by breaking apart the barriers and molds, I was pretty happy with the end result.IMG_5693.JPG

30/10/18 (Slip casting part III)

One the 30th of October I and my group had our final session in slip casting, for this we took our custom made moulds and picked a few pre made moulds to use for liquid clay.

The moulds I picked we’re:

  • My Death Star
  • Fantasy wizard,castle,dragon
  • A duck
  • An apple
  • A lightbulb
  • A unicorn

For each mould we would pour liquid clay into a measuring jug, next we’d pour it into our moulds and leave them for an hour to dry.

Once they all dried we were able to take them out of the moulds, while they were still wet we could alter them any way we wanted

e.g

I took one of my Death Stars and carved the back like it was a Halloween pumpkin.

Wooden Box Final Design

On the 22nd of November, I finally created a use for my wooden box I made two months ago, I decided to use it to store my equipment for writing, crafting and designing instead of just leaving them scattered around my desk

img_4593-2-e1543165207905.jpg

First I chose different kinds of equipment I could put in there first I wanted to store my locker keys in there, so I took a center punch and pierced a tiny hole on the inner part of the top of the box deep enough for the wire to fit in and superglued it in place, I used wire to create hooks and suspenders, The Hooks are bent in a specific way so the keys/paperclips still tangle even when the box is closed and will suspend the super glue, tape, and spirit gum

For the inside of the box, I decided to create unique sized barriers to store more items, for this I used cardboard, I measured it, cut it and tucked it into the box and glue it in place (I would mainly place in these barriers around the object I put in place).

The Hooks are bent in a specific way so the keys/paperclips still tangle even when the box is closed and will suspend the super glue, tape, and spirit gum

Screen Shot 2018-11-25 at 16.50.24.png

Screen Shot 2018-11-25 at 16.54.33.png

As for the top of the lid, I decided to glue on my leftover enameling piece in the shape of the Avengers logo.

IMG_4592 2.JPG

16/10/18 (Slipcast Part I)

On the 16th of October, I and my group started slipcasting, for this we had to bring our own objects into cast. The objects I picked were a small plastic mug and a small Lego death star.

IMG_4310

Before we started casting, we were given tutorials on how to use the materials and equipment, we also had to know how to measure our objects, mix the plaster and create our barriers, once we were given the tutorials, I started work on my mold. First I  measured half of my death star at the width, then I  covered the bottom half in clay, as soon as I built up the barrier I took a sheet of plastic and tied it around the barrier.

     img_4322.jpgIMG_4313

Next, I started to make the plaster mix

First I weighed how much plaster I needed for my mold, I ended up using two pounds, after that, I mixed in two pints of water with the plaster I  then waited two minutes for it to settle  and placed my hand in the bucket and shook my hand round the bottom and dug out any unwanted bubbles, once the plaster was ready I poured it into the mold and waited for it to dry.

25/9/18 (Metalshop part I)

For the other half of the day, I and my group started working in the metal shop. There we were given tutorials on how to work the equipment correctly and safely. After that we started work on our candle holders, we started by taking two sheets of metal and cutting them into shapes

One circle

The other a square

Then we used a spot welder to weld them together, then we learned how to use a plasma cutter to cut the shapes for our holders.

25/9/18 (Wood-shop Part I)

On the 25th of September, I started working in the workshop. For the first half of the day, I and my group worked in the woodshop, we were given tutorials on how to work the equipment both correctly and safely. Once we were given the instructions we started work on our boxes by measuring the length of our wood and cutting it, then on the tall pieces we created the head and shoulder on the two, once that was done we sanded the edges and proceeded to glue the pieces together and place them on the vice for the glue to settle.