On the 23rd of May, I filmed the head stomp scene for my movie, to achieve this I needed:
A styrofoam head
Water balloons (filled with fake blood)
liquid latex
makeup foundation
a wig
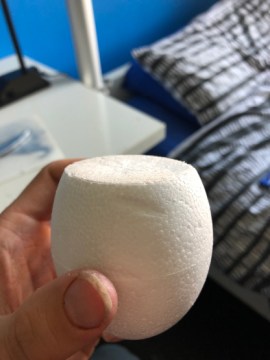
The Head
First I used a hot wire cutter to cut a piece off the back of the styrofoam head and hollowed out the inside and separate piece.
Then I fit the water balloons inside the head and taped the head cap on, then applied liquid latex on the head to smoothen out the surface then I applied makeup foundation to make it lifelike and applied the wig on top.
Filming the scene
Once we filmed the scenes of our actor before the effect happens, we then switched it around and put the head on the body of my stunt dummy wearing the sweater and wig, once it was all in position I proceeded to stomp on the head, it was successful, though there wasn’t as much blood spatter as I was expecting, however, I was happy with the effect.
Note: In case the effect goes wrong in possible future projects, the best thing would be to create spares as backup.
On the 15th of May, I started filming the hole in the hole in the chest effect for my movie, top achieve this I need:
Green card
a long Cardboard box
A couple of grocery bags and a black trash bag
Fake blood
Red paint
The Hole
First I took the Grocery bags and trash bags, cut them up, twisted them and hot glued them inside the walls of the box, next I painted the front row in red and the at back I glued the trash bag (this was to create depth).
The Effect
For the effect I had my friend Emma volunteer, first I cut out the shape of the hole open a piece of green card and taped it to her chest, next I filmed her pretending to have a hole in her chest and acting all shocked. Next, I took the hole and very carefully placed it in the same positio0jn Emma was standing and the green shape was. Once I recorded I was able what I needed I then placed it on my editing software and chromakey I was able to replace the green shape with the hole.
Note: At first I did struggle to aline the two together but in the end, I managed to do a decent job, not perfect but it could’ve been worse.
On the 15th of May, I started filming the heart rip effect for my movie, To achieve this effect I needed:
A pillow
An old shirt to ruin
An old container
Tin foil
Fake blood
A Potato
A balloon
The Heart
For the heart, I took a potato and cut it into a heart shape and fit it into a balloon and glued it shut.
Building the Torso
First I took the container, traced it onto a pillow, then cut it open and removed unwanted stuffing, then filled the container with fake blood and the heart and then cover the top of the container with the foil, to film this effect, I hung the pillow up (while it was wearing the shirt) using a long piece of wire and held it in place.
To film this scene I set up the shot with my actor (Emma) wearing the old shirt and made it look like she was going to have her heart ripped out, then before we switch the actor with the pillow, I filmed a shot of sam about to reach in, then we switched to the pillow and I let Sam shove his hand in to find the heart and pull it out after blending in edit the effect was pretty effective (no pun intended).
On the 25th of March, I started work on the throat-slitting effect
Shopping List:
2 Litre bottle
Clay
Plaster of Paris
Liquid Latex
Heat shrink tubing
Fake Blood
Plastic Syringe
To make the mold I took the 2-liter bottle and drew the shape of the appliance in the center, next I took some clay and sculpted a barrier around the shape, next I mixed up the plaster with water, for the first layer I applied a thin bit of plaster, then I let the rest drizzle on the sides.
Once the plaster was dry I removed the clay and the plaster was dry, I removed the clay and the plaster created the mold exactly the way I wanted it.
The Appliance
Next, I took the mold and started applying the latex, I started by applying a thin first layer until it dried I repeated this 7 more times and waited 15 minutes between each layer. Once all 8 layers were dry I peeled off the appliance using baby powder.
The Effect
To prepare the effect, I flattened down a piece of heat shrink tubing, sealed one of the ends and cut a line by the seal (this is were the blood actually come out of), next I attached the heat shrink to my neck using liquid latex (to dry it quickly I used a heat gun and at a distance tried not to burn my self), once the tubing was applied I then added on the appliance with more latex to help it blend in, after drying it with a heat gun I then applied some flesh tone make up foundation to help it blend with my skin color, next I filled a plastic syringe with fake blood and connected it to the tubing. To film the effect the timing had to be right, so when I’d drag the fake knife across my neck I’d pushed down on the syringe so the blood pours out at the right time. It was a decent success, the problems were the timing and the thickness of the blood, the next time I tried for the actual movie I watered the blood down a little bit more.
Note: In order to improve the quicker blood flow, I had to keep the tubing straight to prevent leaks and blockage, before filming the actual scene I tested it out on a stunt dummy I built and used water, this proved to be helpful, so when we finally filmed the scene it was successful.
For my movie, I also created prop weapons to include with the effect and display at my end of the year show.
The knife
A plastic knife
Plasticine
Silicone
Jesmonite Part A and B with metal powder
Black and silver spray paint
To make the knife I took some plasticine (enough to fit the size of the knife) and pressed the knife against it so it covers half of it, next I took a sheet of metal and covered the sides and secured it in place, Next, I mixed up the silicone and poured it onto the knife. After 24 hours I turned the mold over and covered the other side in silicone, After another 24 hours I then removed the plastic knife, then I set up the two-part mold by cutting a funnel shape at the top, then after suspending the two pieces together I mixed up the Jesmonite and powder and poured it into the mold, after 20 minutes I took the knife out of the mold, finally I added finishing touches By spray painting the blade silver and the handle black.
The Hatchet
A foam hatchet
Silicone
A piece of scrap wood
Wood Varnish
Jesmonite Part A and B with metal powder
Black and silver spray paint
To make the hatchet I first started by tracing the handle of the foam hatchet onto a piece of scrap wood, then I cut it out on the bandsaw and sanded the edges to create the curves and applied dark brown wood varnish to match the original. To make the blade I took some small pieces of scrap wood tall enough to cover the blade and secured them in place, once I got it to the right position I wanted I then mixed up the silicone and poured it into the box after waiting for 24 hours I removed the mold cut parts of the back and top in order to wiggle it out, once I secured it again I mixed up the jesmonite and poured it into the mold, after waiting 20 minutes I pulled the blade out cut off any unwanted bits, Next I drilled a hole at the top of the handle and the bottom of the blade, after spray painting the blade black and silver I took a small wooden dowel and fit it in between each socket and after adding a bit of glue into the sockets and dowel the axe was complete.
The grenade
A styrofoam Easter egg
Foam core poster board
Tissue paper
Green and black acrylic paint
A thin piece of metal
A plastic bottle
A key ring
A piece of wire
Hot glue gun
To make the grenade I took the easter egg and cut a bit of the top off, then I drew a bunch of small squares on the poster board, cut them out and hot glued them around the egg and I cut out a circular piece of poster board to glue on the bottom to help it stand on its own, Next I cut the top part of the plastic bottle and glued it to the top, then I drilled a small hole at the top, next I covered the egg with PVA glue and tissue paper, once it dried I spray painted the whole thing silver, after that I took the thin piece of metal and cut it to look like the safety lever and hot glued it to the bottle cap, then I painted the main grenade in dark green, for finishing touches I took a piece of wire and a key ring, bent the wire in a small circle around the key ring and spot welded it in place and cut the wire, this acted as the grenades safety pin.
On the 28th of May, I started work on the eye rip effect, for this effect I needed:
A Styrofoam head
A lump of clay
Liquid Latex
Fountain make up
Black paint
A small plastic bag filled with “blood”
A small stone
A piece of string
The Eye
For the eye, I took a piece of clay and rolled it up into a ball, then I glued a piece of string to the back, next I spray painted the ball white and hand painted the eye details and painted the string red.
The Head
For the head, I used a hot wire cutter to cut a piece from the back, then hollowed out the inside and the separate piece(to fit the plastic bag inside), then I cut a hole in the right eye deep enough for it to reach through. To help the blood pour out correctly, I took a lump of clay and made a curve to make sure it was going out the right way.
Before setting up the eye, I covered the head in a few layers of liquid latex to smoothen out the surface, after that, I applied foundation make up all over the head, finishing touches were painting on the facial hair to match the actor.
For the rig, I poked a hole in the bag, fed the string through and tied the stone inside, then I placed the eye in the right position and closed up the head.
Once we got into position I had Sam rip the eye out, the final result wasn’t what I had intended since the whole bag ended up being pulled out and the stone didn’t tear the bag completely, however, I believe the effect went well never the less, the best idea in future always have spare heads in case anything goes wrong
Note:
This effect was originally supposed to be an eye stab effect, but due to a few failed attempts I divided to go with something similar and have my own idea on how to pull it off
(The original idea came from watching a BFX tutorial)
*This effect can be dangerous, if not done properly*
For the neck snap, all I had to do was have the victim (Sam) ready in position, next, I’d come up from behind. place my hands on the top of his head and chin and get ready to twist his head, however, I’m NOT the one who’s turning the head it’s the actor, if done correctly at the right speed the effect can look pretty realistic (the final touch is a gruesome and realistic sound effect and you are done).
Face Slash
To prepare for the face slash effect, we did a few practice shots by using water and I got ready in position, what we did was I had Sam holding the hatchet and as soon as he swung it in front of my face I spat out the water, once we got the rhythm and were happy with it, I then had a mouth full of “blood”, filmed it and I was satisfied.
On the 26th of March, I started working on a knife being thrown into the head effect as part of my locus and movie project.
Shopping list:
Two plastic knives
Thin copper wire
With blood:
Plastic syringe
Tubing
Fake blood
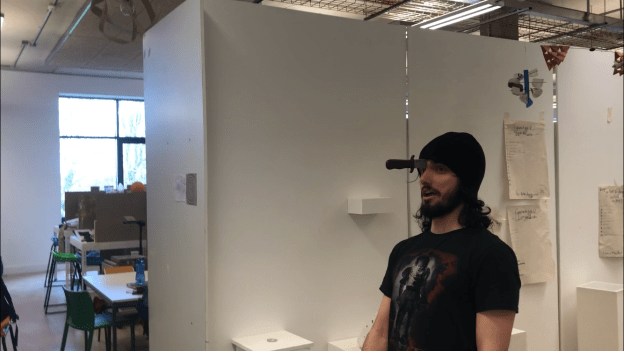
The Knife
First I started by cutting one of the plastic knives in half and drilled a small hole at the top end of the blade, next I took the copper wire and hot glued the end of the wire to the end of the hole, next I bent the wire around my head and held it in place (using paper clips and covering my hair with a beanie).
The Test Video
For the first shot, I had my friend Sam holding the knife without throwing it. So I had him look like he was about to throw it, then the camera quickly panned out to an empty space.
2. For the second shot, I had Sam make a similar move to the one from the previous shot, but without the knife, then he pretended to throw the knife and the camera panned to me wearing the wire knife, then I blended it all in editing.
The Blood Version
For the blood version, I took a plastic syringe and tubing and hot glued the tubing to the wire and attached the syringe (filled with fake blood) to the tubing, the result was pretty decent.
What I have chosen to focus on for my locus project is to showcase all my practical effects and movie props into a short movie
Title:
Sam and Ewan vs Everyone
Plot:
The plot is basically me and my friend Sam out of nowhere going insane and on a rampage, slaughtering our classmates in ridiculous gory fashion.
Practical Effects (in order):
Throat slit
Knife throw
Heart ripped out of the chest
Gunshot Wound
Neck Snap
Head Stomp
Eye Stab
Hole in the chest
Face Slash
Stunt Dummy
Gunshot to the head
Stunt Dummy (Again)
Production Process
First I’ll write a list of practical effects to use in the movie and then draw designs on how to build and pull them off.
Once all the effects are sorted out, I’ll draw a first draft storyboard of the whole movie and even time each scene based on how long I want the shot to last for.
I’ll conduct a series of tests on each effect, testing various materials and techniques, this is so I can be prepared for when we finally make the movie so we can know what to do at certain times
For each effects test, I’ll buy the right props and equipment for each test and even make a test video and each one will go to my youtube channel.
I and Sam will go round our group (or possibly around campus) and ask any friends or classmates to partake in the movie, mainly as a victim in the movie
To prepare each actor for the scene they’re partaking, I will sit down with each of them and go through what I want them to do, how they’re going to do it and walk through the procedure of the effects that are going to happen to them (if they’re playing a victim)
If necessary I and Sam will book filming equipment to use to help in our production and even ask classmates (not partaking as an actor) to help out behind the scenes
We’ll film each scene in the right order, except for the beginning which will be done last
After each shot, I and Sam will look over the footage and see if we’re satisfied
I will do the editing, put each scene in the right order and adding in the right sound effects
I will show the whole movie to the cast and crew
I will prepare for the final show by planning to premiere the movie in a dark room for people to watch and even make posters and trailers to advertise the movie
After people watch the movie, they’ll see all the props on display with screenshots from the movie
It’s supposed to be violent, but with a more comedy theme with over the top effects, nonsensical action, and (if we’re lucky) intentionally bad acting.
I want it to be a movie thats supposed to be stupid and over the top, while it has a dark theme showing two students mindlessly killing people, I don’t want people feeling disturbed watching, I just want people to enjoy the silliness of it and appreciate the practical effects and techniques I used for it.
A perfect source to compare this to, one with the same idea, a dark setup but a funnier delivery.
First I was given a tutorial on how to cut, sand, clean and glue the glass, once I was given the instructions I needed I started making my model, a glass hand.
First I drew out each piece in my notebook.
Next, I took the glass and drew the right measurements of each piece on the glass then using a glass cutter I cut out each piece and arranged them in the right order, next I took some thin wire, cut it and used it to create the details in the fingers and thumb and using glass glue to secure them, next I cut more pieces of glass identical to the original pieces and glued them on top, once they were fired in the kiln I was able to hook the fingers on the hand. I was happy with the end result.


 Next, I took the glass and drew the right measurements of each piece on the glass then using a glass cutter I cut out each piece and arranged them in the right order, next I took some thin wire, cut it and used it to create the details in the fingers and thumb and using glass glue to secure them, next I cut more pieces of glass identical to the original pieces and glued them on top, once they were fired in the kiln I was able to hook the fingers on the hand. I was happy with the end result.