Featured

Medal Making process

On the 10th of October, I started process on my medals first I created oven bake plasticine models ( the key for these was to make certain parts of the model slightly three dimensional) Next I put them in the oven for 15 minutes at 130 degrees. Once all the models were hardened I then took them down to the wax room and made blue latex molds to make experimental wax medals, once the molds were prepared I poured in the hot wax and waited for about an hour for them to dry.

The Front

For the design of the front, I would model it from a certain element of one of Ed Wood’s movies (e.g poster design or scene), The two designs I made were based on two of his most famous movies: Glenn or Glenda (1953) and Plan 9 from outer space (1959). For Glenn or Glenda, I modeled the design based on the poster, where it shows a half man half woman person with a question marks all around it to emphasize the plot of the movie (which is a sex change flick).

For the layout of Plan 9 from Outerspace I sculpted a view of Hollywood hill and placed three flying saucers hovering over the city (for each saucer I’d draw a line on top of them, indicating that there really on stings and not really there, this is a reference to how bad the special effects are.

The Back

For the back, I chose a specific quote that relates to post humorous success, Ed Wood’s work and how it was seen. The quote I picked was from John Stoan

Quote: “What difference does it make whether your work is appreciated or not? The work will still be yours anyway, most of us are only appreciated after we are dead”

The Silicone Molds

To create the silicone molds I had to create a support out of plasticine and placed the model in the center of the support, then I cut up some pieces of thin sheet metal to act as barriers and to prevent the silicone from leaking. Once I mixed up the right amount of silicone and pigment, I then poured it onto the mold and using a back massager to get rid of the bubbles. After 24 hours, the silicone was dried and I was able to pull the model out of the mold, so then I started pouring in the hot wax, the results were slightly better in detail and quality.

IMG_8681

My Top Choices for my Da Vinci Project

When it came to creating designs for my Da Vinci Project and creating more unique iterations of well known technology and reverting it back to Da Vinci’s time, I had to narrow down my ideas and select my ideas based on their design, function and overall interest in design and engineering them.

So through the many ideas and process of elimination, I managed to put together my own choices for my personal collection, starting with…….

The Prosthetic hand

This design and model is by far my favourite and most ambitious idea, mainly because of all the work and process went into it, as well as its idea of functionality.

My original idea for the hand was to be operated by a series of strings that were connected to the fingers and to move them in position they would have to be pulled and hooked in place by the amputee, with two sets of five strings on the palm and backhand, it could be used to make a fist, give a thumbs up, point and even give the middle finger.

However, I wanted to take this idea further, so I designed and built a new prototype that was able to move on its own via arm movement.

Now the function was different compared to my original, however it still carries the idea and set of its predecessors, more specifically the the two series of strings connecting to the front and back of the hand.

The latest design consisted of elastic cord attached to the back hand and fed over each finger, this was so the fingers would stay up and the strings (attached to the muscle brace) would pull the fingers to form a fist.

The Type Writer

Like the hand my main idea for my typewriter function was elasticity, more specifically, each of the typing key would be suspended by rubber bands wrapped around the hooks, thus keeping them in place, so whenever the user types a key the rubber band then pulls the key back into place.

Glasses

The glasses were a fairly simple design, for my version I wanted to give it two unique features, were you could switch out the lenses for a different thickness as time goes by, another feature I thought of was an attachment of multiple switch lenses for artists, scientists and/or model makers.

The Micro Scope

One of the microscopes features is similar to the glasses, were you can switch the thickness of lenses at anytime, however for this the lenses (I call Micro-discs) are inserted into the main shaft of the scope in order to get a closer look at the specimen.

One of the key ideas of this project was to recreate modern ideas in Da Vinci’s eye, this would either mean simplifying or overly complicating the designs of our current inventions, for the microscope, rather than turning the dial to zoom in for a closer look, the idea is to simply push down the upper scope for a closer look and using the micro-discs for an even closer look.

The reason I chose these particular kinds of inventions was because if Da Vinci was way ahead of his time, logically he was want to design and create inventions worthy of expanding his need for knowledge and research into medical and scientific technology.

For example if he wanted to further his research in science he would use the microscope to get a better understanding of the human or animal body, possibly expanding his knowledge in medicine.

He would also use this prothetic hand design to further the use of prosthetic to allow amputees of the renaissance to have easier lives, since it would a huge upgrade from a hook or wood/metal hand that doesn’t move.

My Da Vinci Sketchbook

For my final project, I created a select few of models based on my Leonardo Da Vinci inspired sketches.

When starting this project, I knew if i was going to build like Da Vinci, I had to think like Da Vinci, So I bought a sketchbook to specifically draw and design either my own Da Vinci themed ideas (based on old/modern technology or reimaginings of Da Vinci’s designs.

Here is the link to my Sketchbook Powerpoint:

https://outlookuwicac-my.sharepoint.com/:p:/g/personal/st20142403_outlook_cardiffmet_ac_uk/EV6j2E4skOxPnzyOxWDKT9cB_Zior2t7oNVrLVVXNKomGg?e=Kt8cjg

Preview:

Current Progress

The current stage my project is at now is slowly transitioning from research and design to CAD work and creating small simple prototypes to test their design, stability and to test wheter my designs actually work or make sense.

So far, I’ve created prototypes of my microscope, glasses and hand

To see if my design work or make sense, I would first start by sketching the pieces of my designs on paper, then I would cut them out and trace each piece onto foam core poster board, once all the pieces were cut out, I then drilled holes onto the ends of each finger joint and through the hand, to secure the fingers and joints in place I used toothpicks and glued the ends to keep them in place.

Foam Core poster board prototypes

The Typewriter prototype

3D Prototypes

The Hand

Before I moved on to using Fusion 360 to develop my skills and learn more intricate techniques, I started by using tinkercad to create the basic shapes, I started by creating my prosthetic hand.

I first started by creating and printing a finger, the result was decent, although I did have to alter it by cutting chunks off each section and sanding the sides of each joint, this was so the finger was able to move around properly and curl into a fist. Once all the pieces were modified, I cut up some toothpicks and slid them through the holes on each joint and glued them in place. (This was useful, for the next time I design the hand, that I would make sure that there’s plenty of distance between each finger joint, allowing the fingers to move flowingly)

Once I was satisfied with the finger movement, I then designed and printed out the main hand so I could attach all the fingers to.

Once the main hand was printed out and all the fingers were cut and trimmed down i then inserted the fingers into the knuckle slots and kept them in place using toothpicks and gluing the ends in place with superglue.

Once all the fingers were attached, I took my dremel and drilled holes to each joint of the fingers and glued in these loop pieces I 3D printed then I took some string and tied knots at the ends to secure in place, this would then allow me control to move the fingers in the direction way I wanted.

The Fully assembled Prototype- I was happy with how the build turned out in quality, build and function, especially how the fingers moved, for future models, I might consider using fishing wire as opposed to string, this would help hide the strings and add a little subtlety.

Here is a link to a video of my prosthetic hand in action:

Collect

on the 23rd of February, I and my class room were given an excercise at looking through the Collect exhibityion and it’s total of 36 collections and picking one or more as our favourites.

Collect is a collection of thirty two sculptural pieces and sets created by various artist, my favourite one in particular was the “House on Mars” Gallery, created by:

  • Attua Aparicio (ceramic)
  • Ela Bauer (plastic)
  • Ana Margarida Carvalho (metal)
  • Juliano Cordano (wood)
  • Faye Hall (textile, metal)
  • Zachary Herrmann (glass)
  • Karin Herwegh (wood)
  • Lambert Kamps (multimedia)
  • Peter Marigold (plastic)
  • Nicholas Marschner (metal)
  • Lina Peterson (wood)
  • Anna Ray (textile)
  • Zoe Robertson (plastic)
  • Alicia Rowbotham (textiles)

The collection showcases a set of jewelery and table wear made of wood and ceramic .

I like this collection for its design, colour scheme, shapes and how it reminds me of my collection idea for my final project, about my Da Vinci themed fantasy collection in creating five model of inventions/everyday appliances in the style of Da vinci designs and renaissance aesthetic, these include glasses, a type writer, a microscope and a prosthetic hand, etc.

A link to the exhibition:

https://www.craftscouncil.org.uk/collect-art-fair/collect-2021-exhibitors/house-on-mars-gallery

Exposure Part I

Artist Statement   

What?

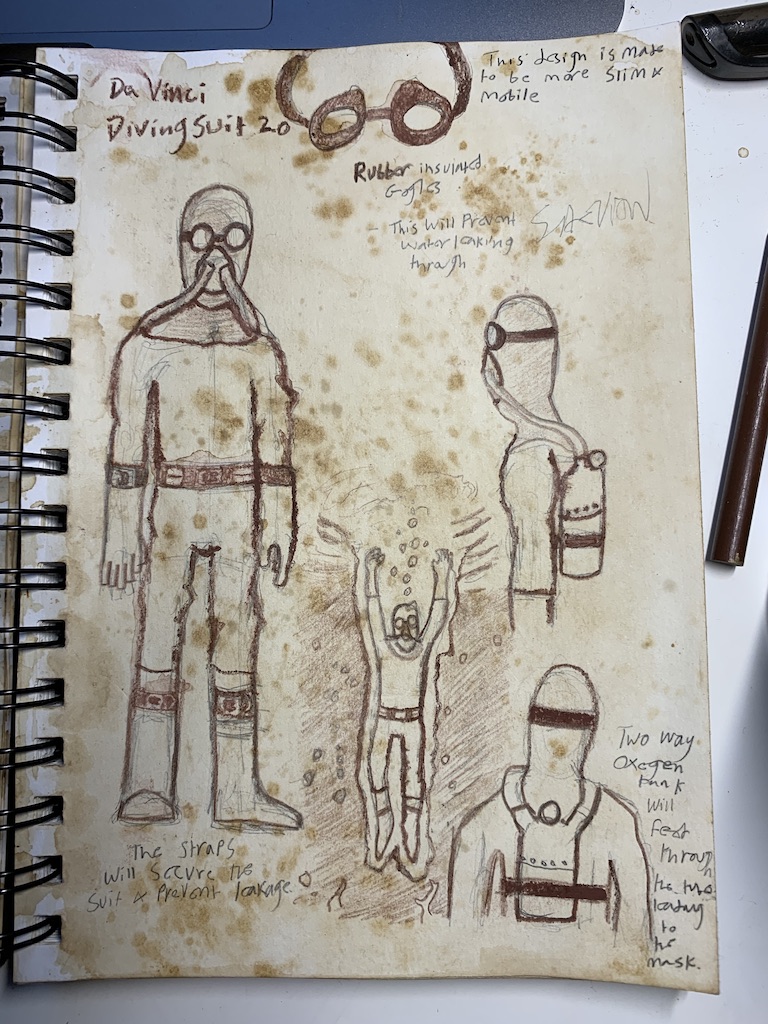
I design and create Da Vinci themed models based on his designs (reimagined) and what current or old technology would look and function if he invented them, with this I want to create a fantasy collection to both express my interest in Da Vinci’s work and create new and different reimagining’s of old and current technology.

How?

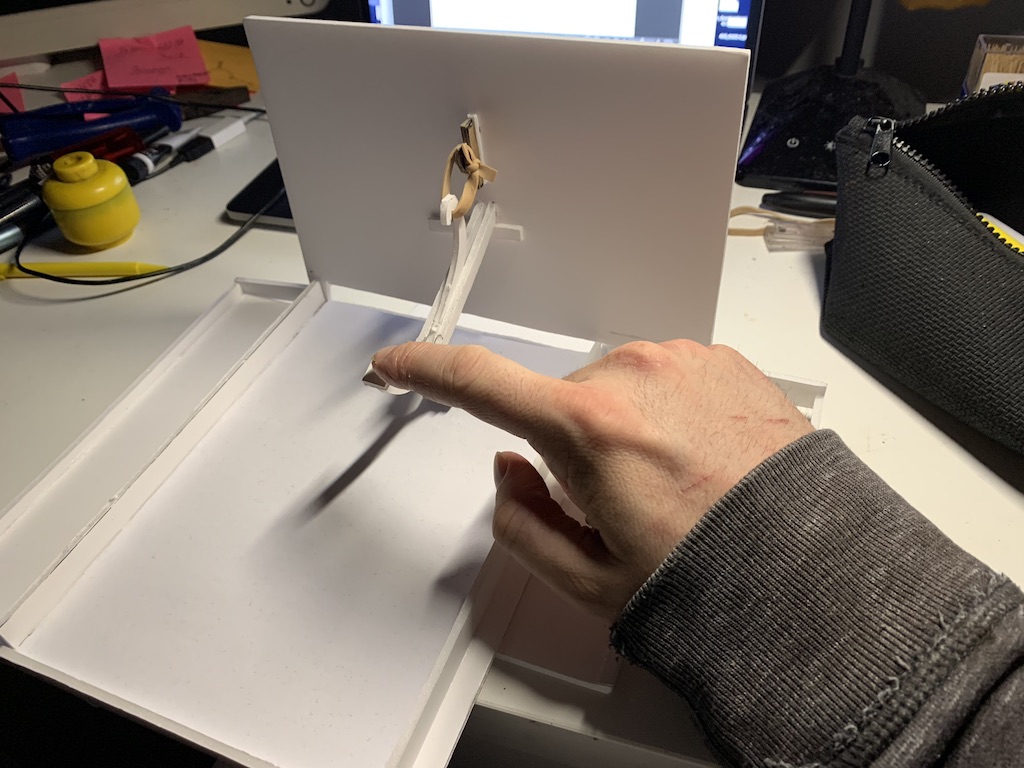
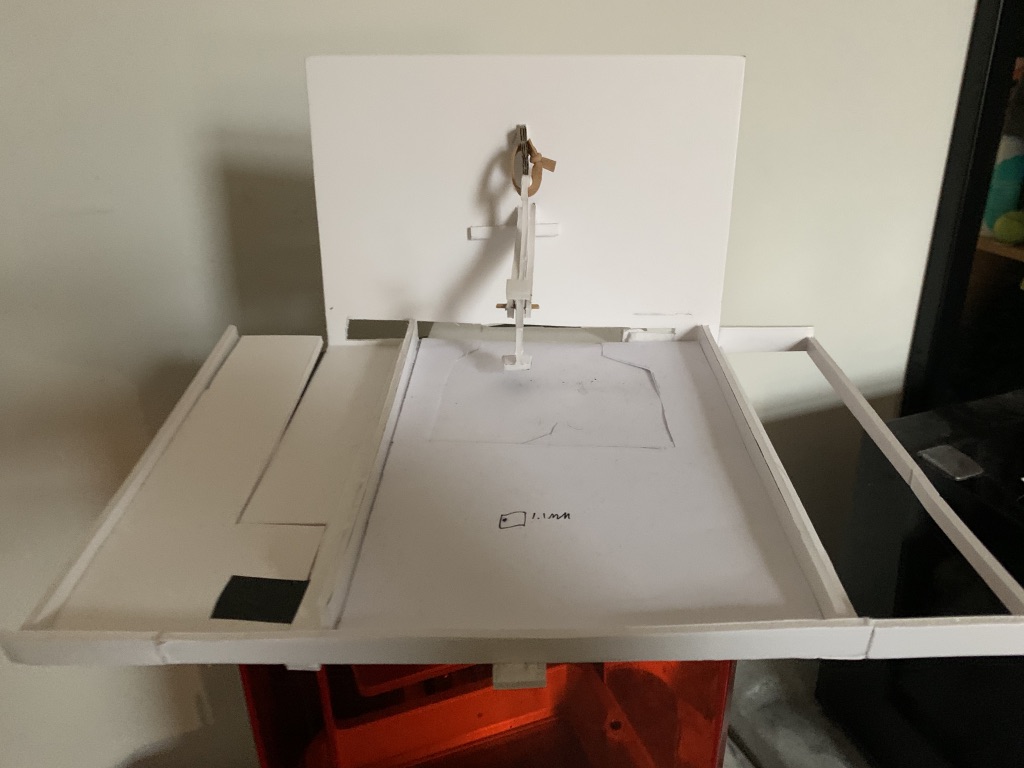
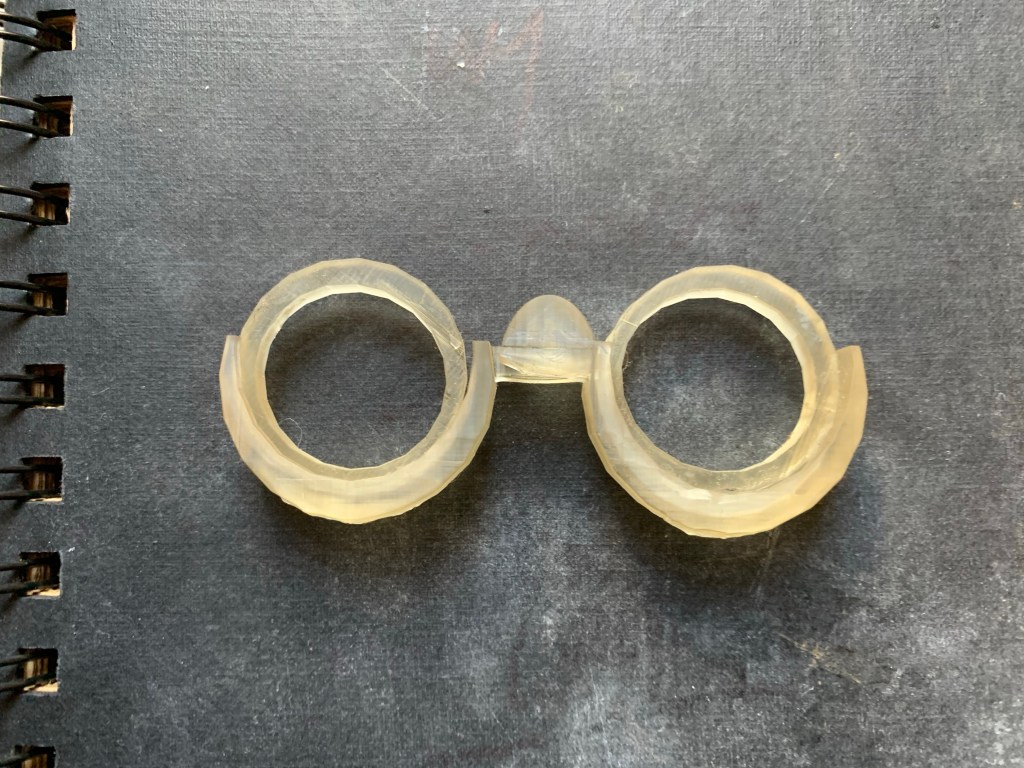
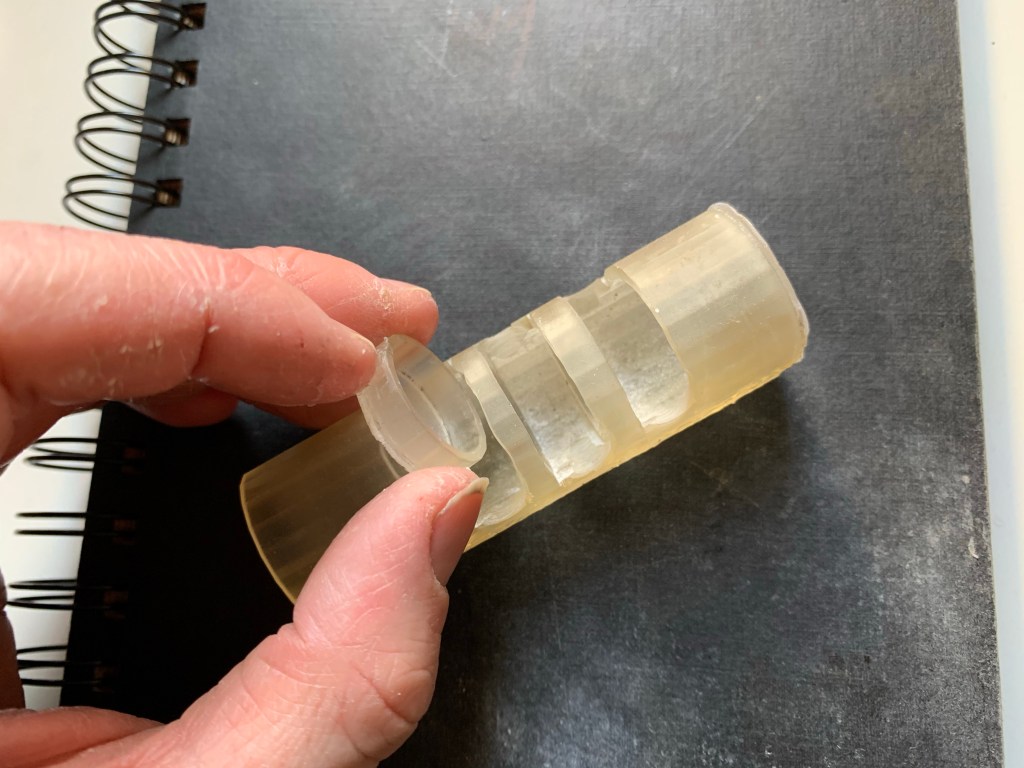
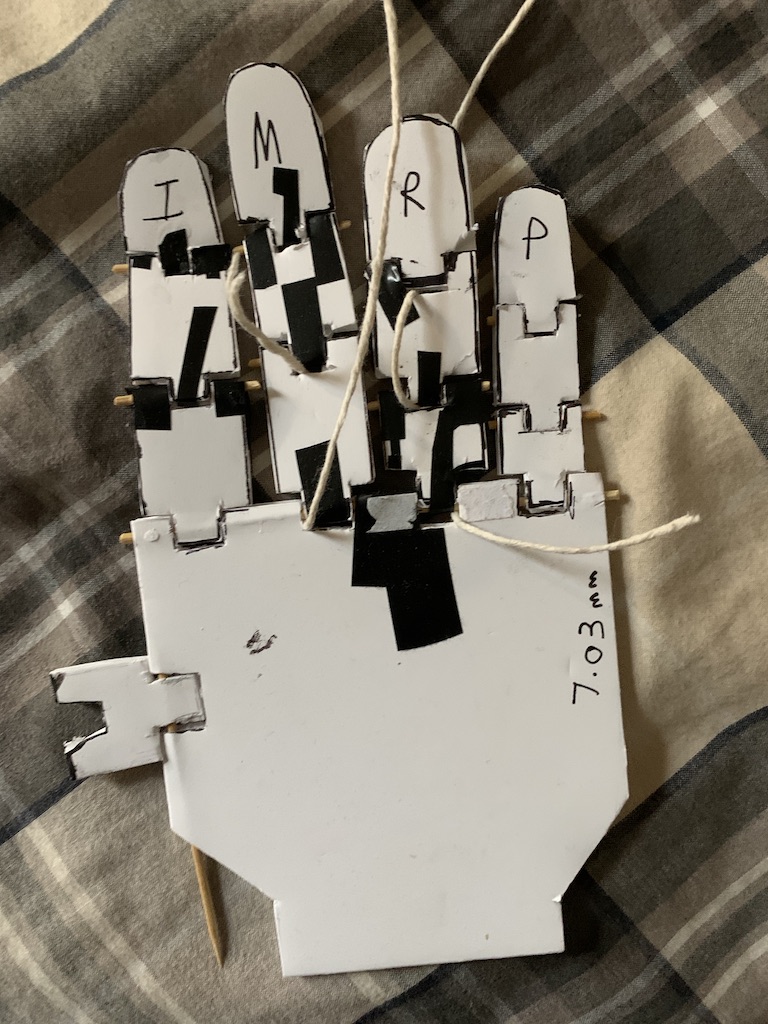
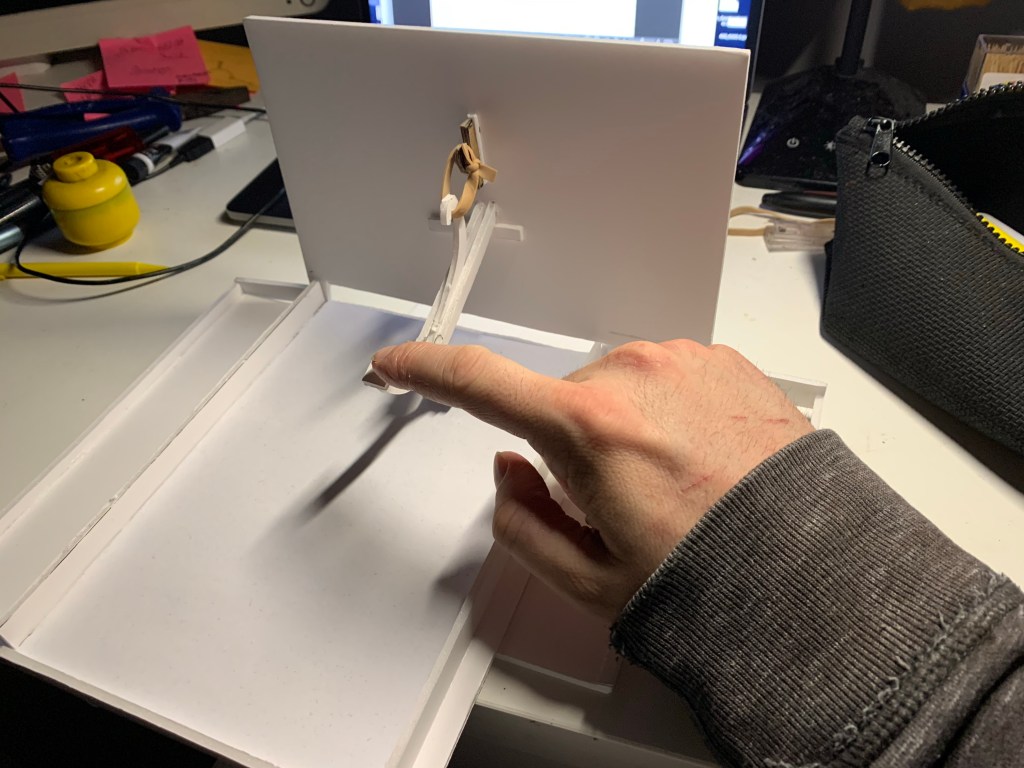
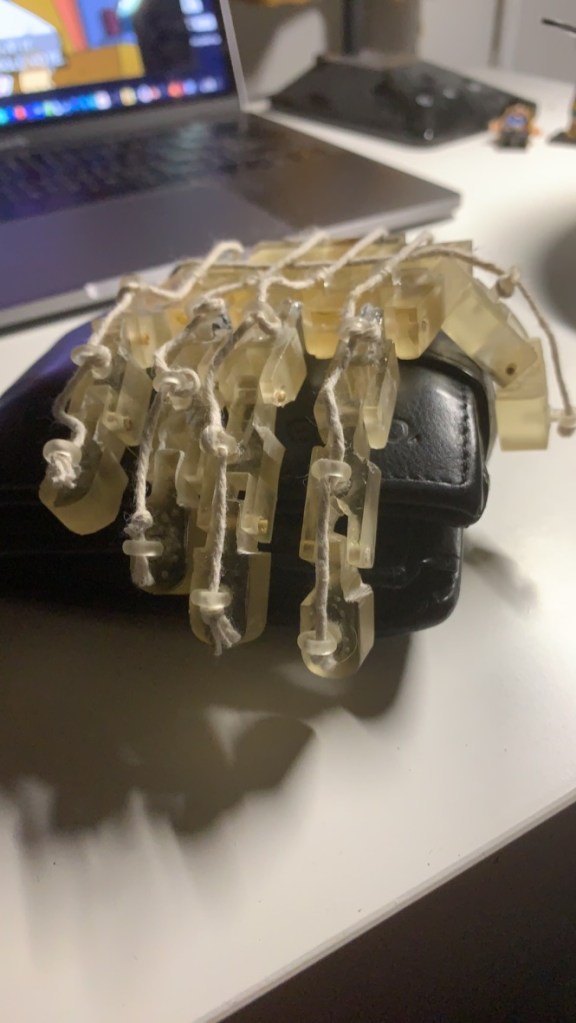
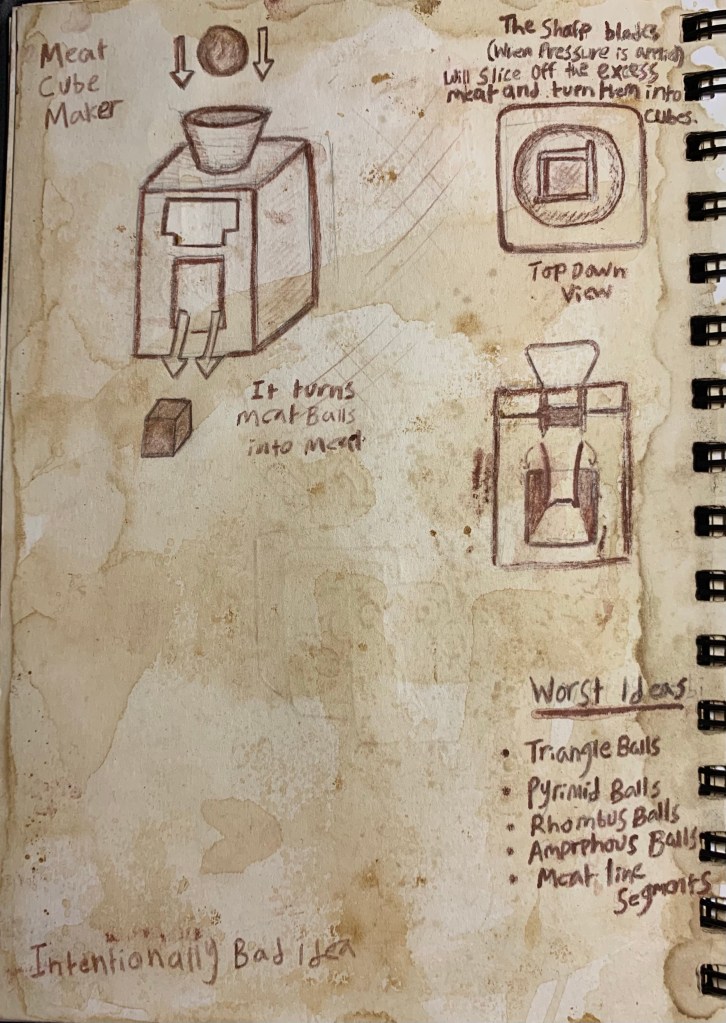
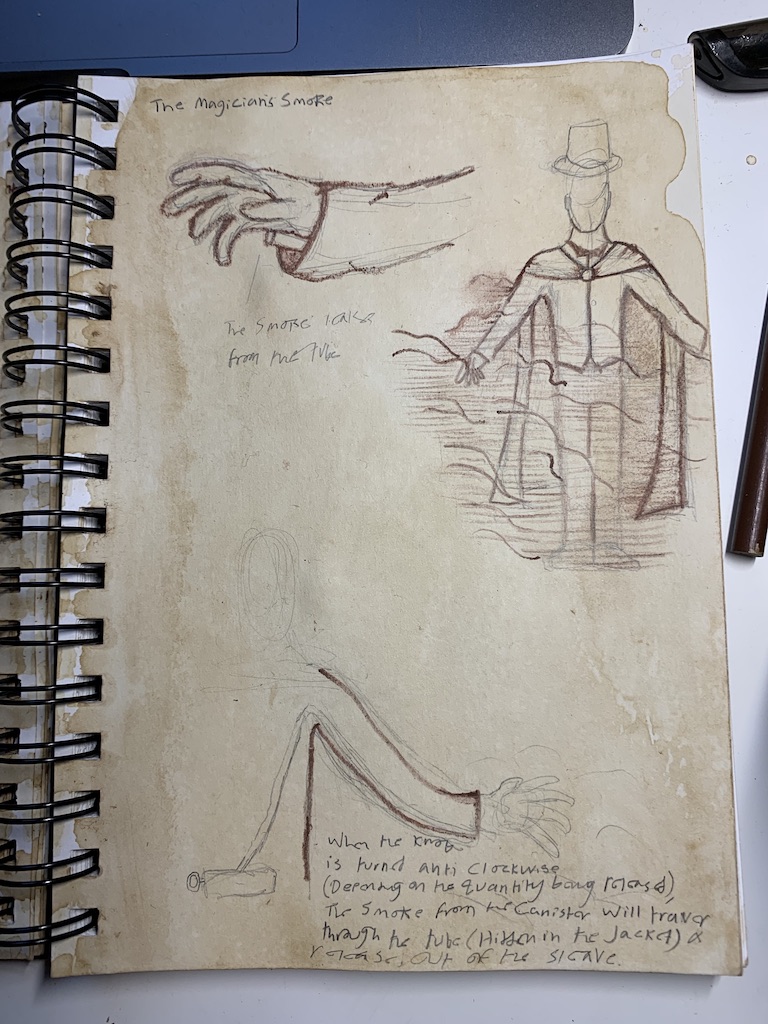
First, I draw these designs out in my Da Vinci sketchbook, to check if my design could work (in terms of either putting it together and possibly functionality), I would create a prototype using foam core poster board or card paper, once I’m happy with the design, layout and possibly functionality, I’d then start measuring the model and its pieces to program into cad, once all the shapes are copied into CAD, I then make them smaller for the 3D printer, because they don’t necessarily have to be too big.

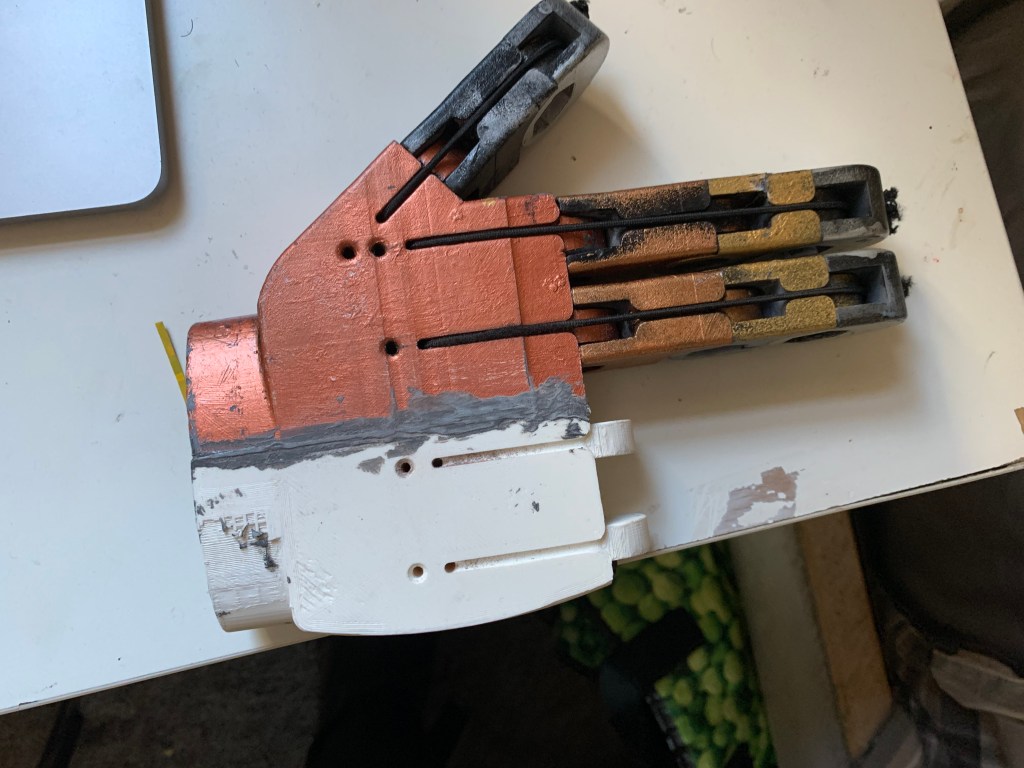
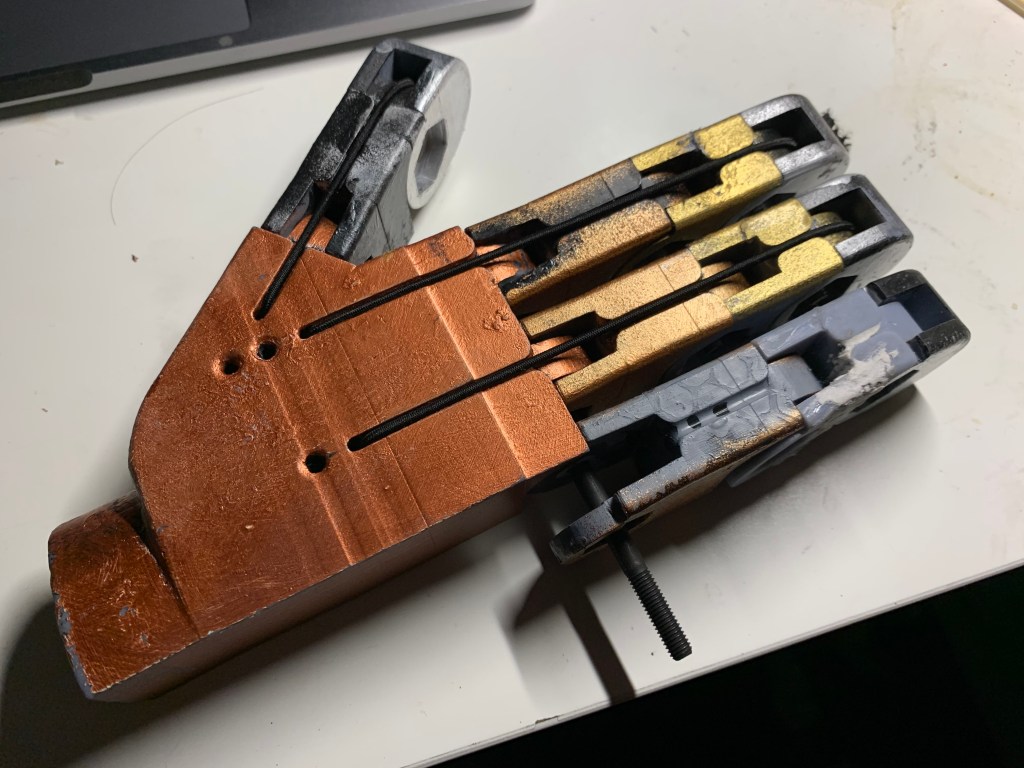
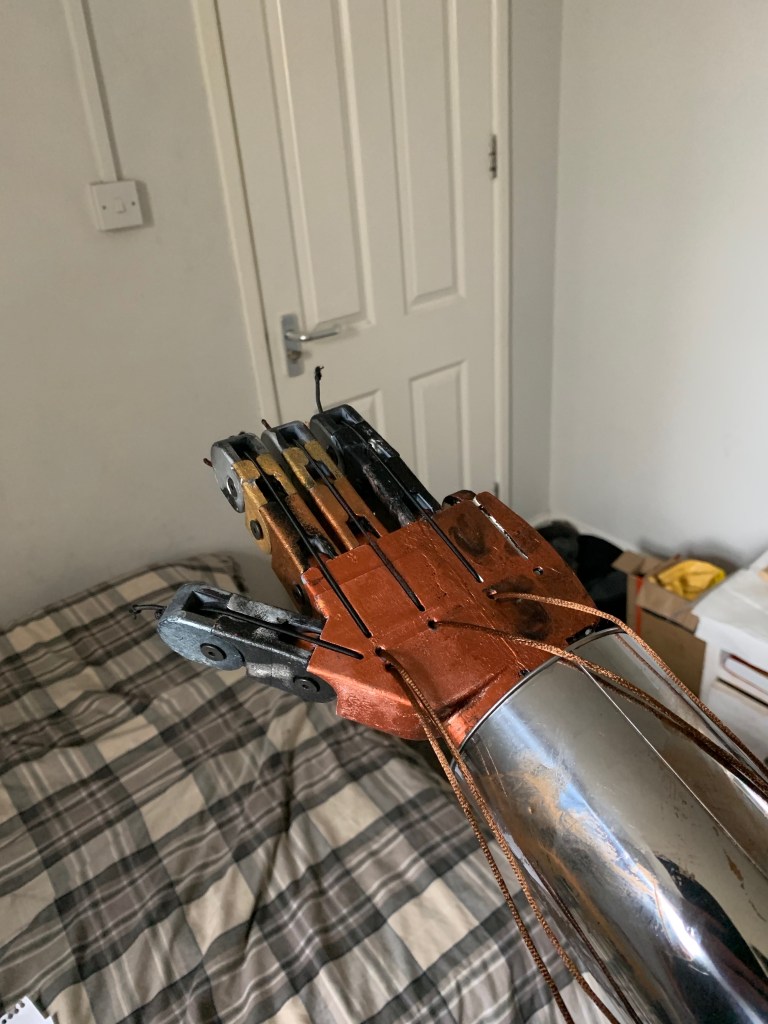
Once all the pieces are printed, washed, dried and cured, I’d then start to paint each big in a particular colour scheme (the colour palate is supposed to represent the kinds of metal and material that Da Vinci would’ve used in his time to give a steampunk look, such as Gold, copper, bronze and silver), once all the pieces are painted, I’d either piece them together or drill holes in the pieces and suspend them on rods to create the look of an explosion, so it shows all of the pieces.

Why?

I chose this project because Da Vinci is my favourite artist and the best way to explore my interests in this project (as well as any other projects) is to create my unique models and designs, this can give me an opportunity to both create interesting interpretations of technology we know today and to think and build things like my favourite artist.

Current Progress

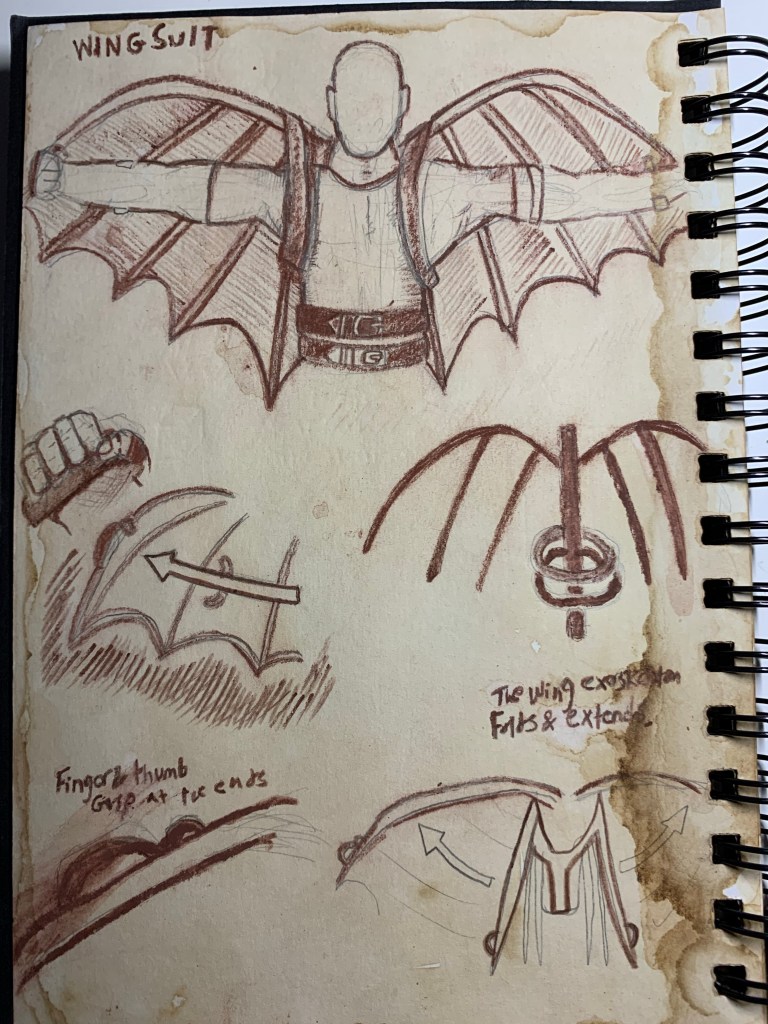
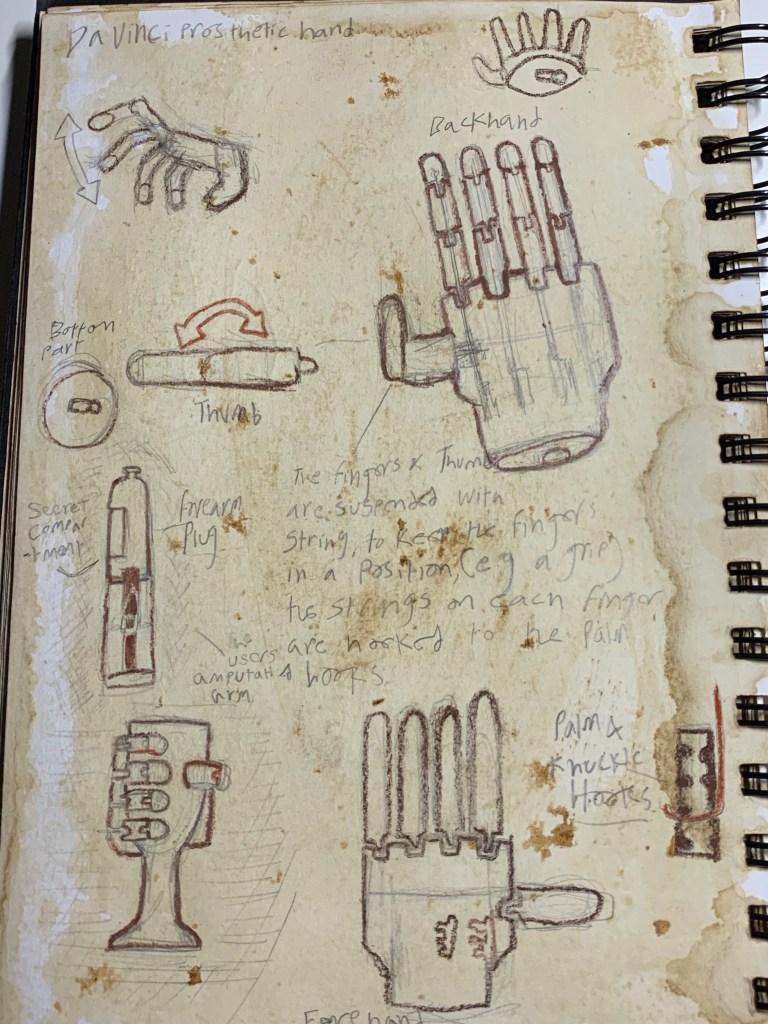
Currently, my work is in the design stages, where I am currently drawing new designs on a daily basis, these designs are either based on old fashioned or current technology and some of them are reimagined designs on Da Vinci’s designs to give them a slightly modern update while also containing that same renaissance aesthetic.

Once I have created enough designs and once, I go through the process of elimination, I will then have picked less than ten or possibly five designs for me to create on CAD, 3D print and decorate for display, each model will displayed with their own blueprint as well context behind each model.

Visuals of Practice

Collection Proposal

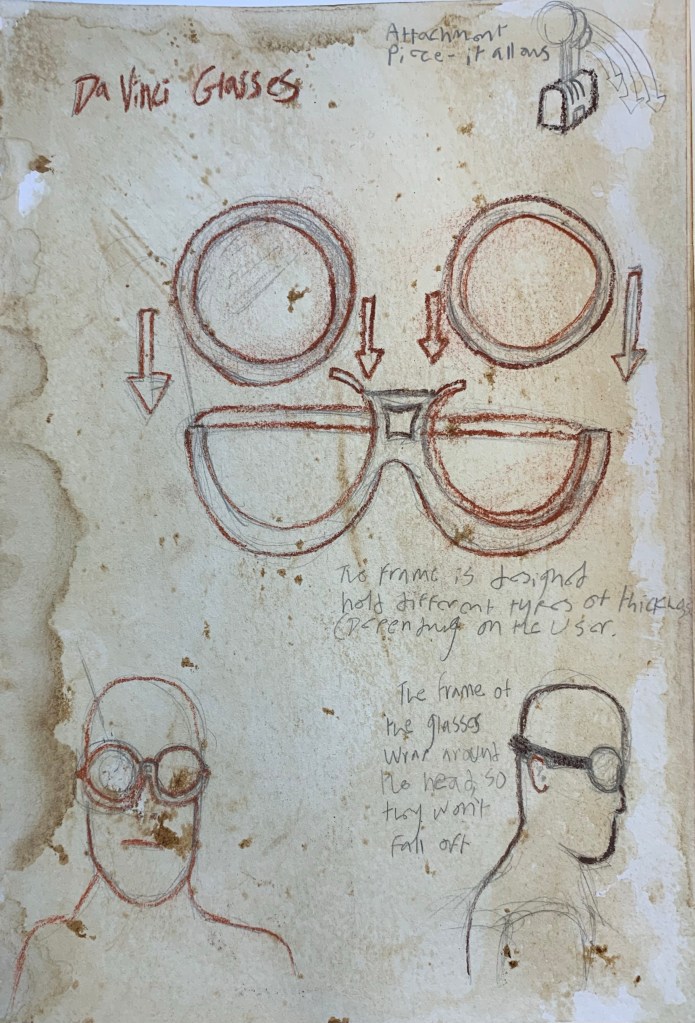
For my project, I intend to create 3D printed models of my designs inspired by Leonardo Da Vinci’s blue prints, these will either be reimagining’s of Da Vinci’s work or Da Vinci style iterations of old/modern technology.

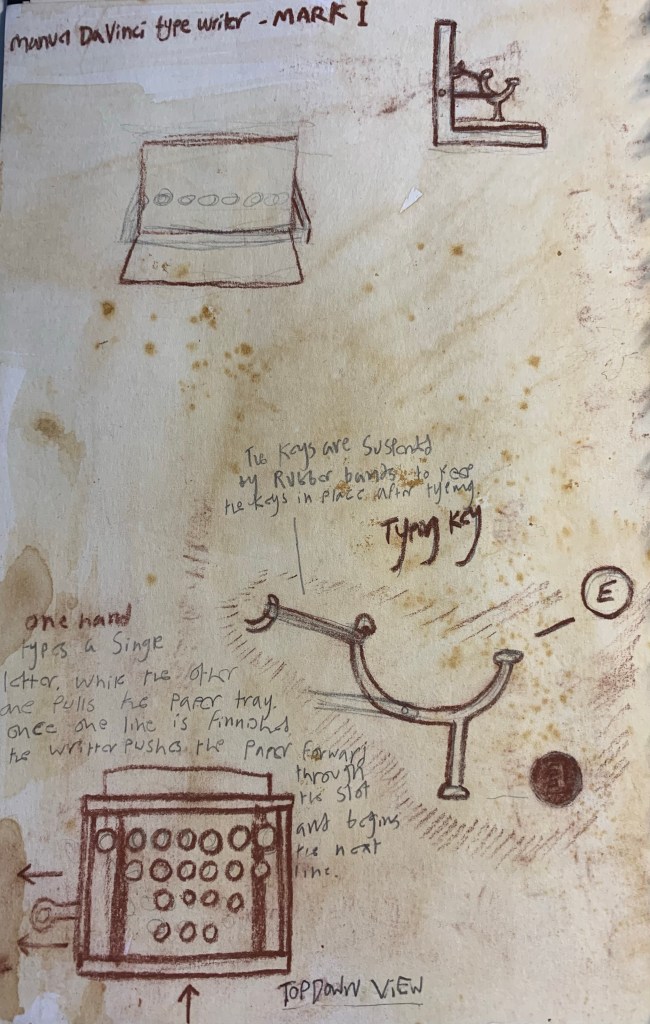
For example, one of my ideas involve creating a typewriter that functions differently compared to a normal typewriter, the process includes using one hand to types the keys and the other to drag the paper tray to the left, once one line of writing is finished, the paper is then pushed through the slot at the back, the typing keys are suspended by rods that attach to the back, and to keep them in place (when typing) are hooked using rubber bands.

The final outcome will be a collection of models based my five chosen designs, each model will be displayed along with their own blueprints, these will include layouts of the pieces, their functions and their paragraphs containing context for their inspirations as well as their intended function (whether or not they would actually work).

Defined professional trajectory

Professional Practice

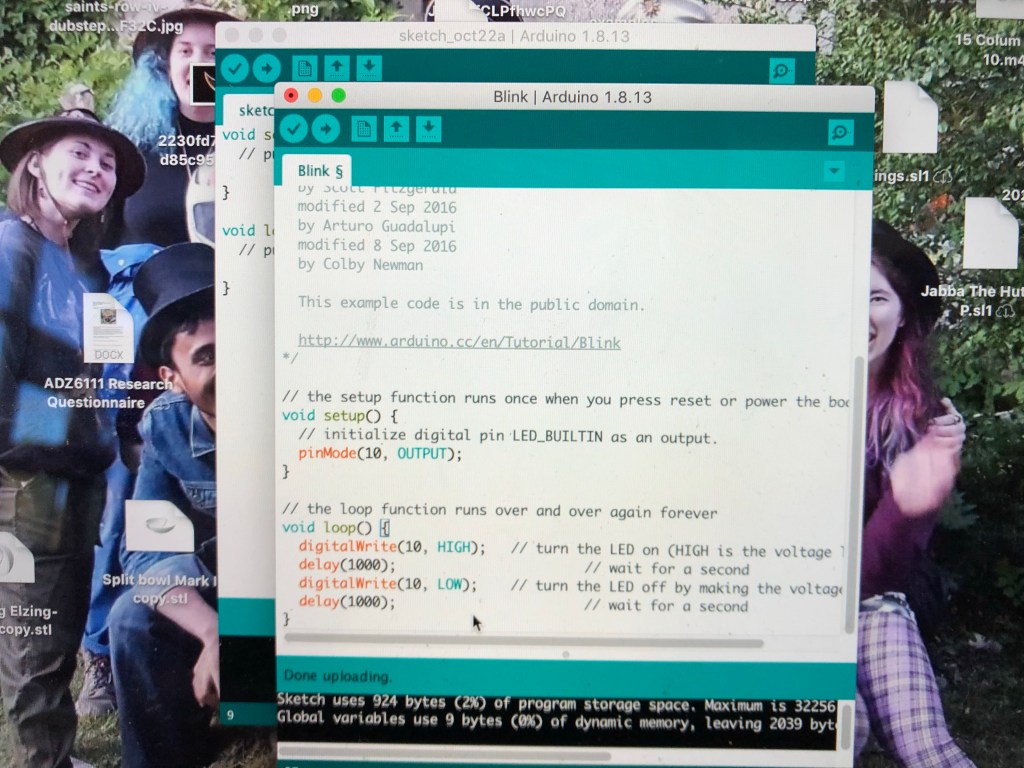
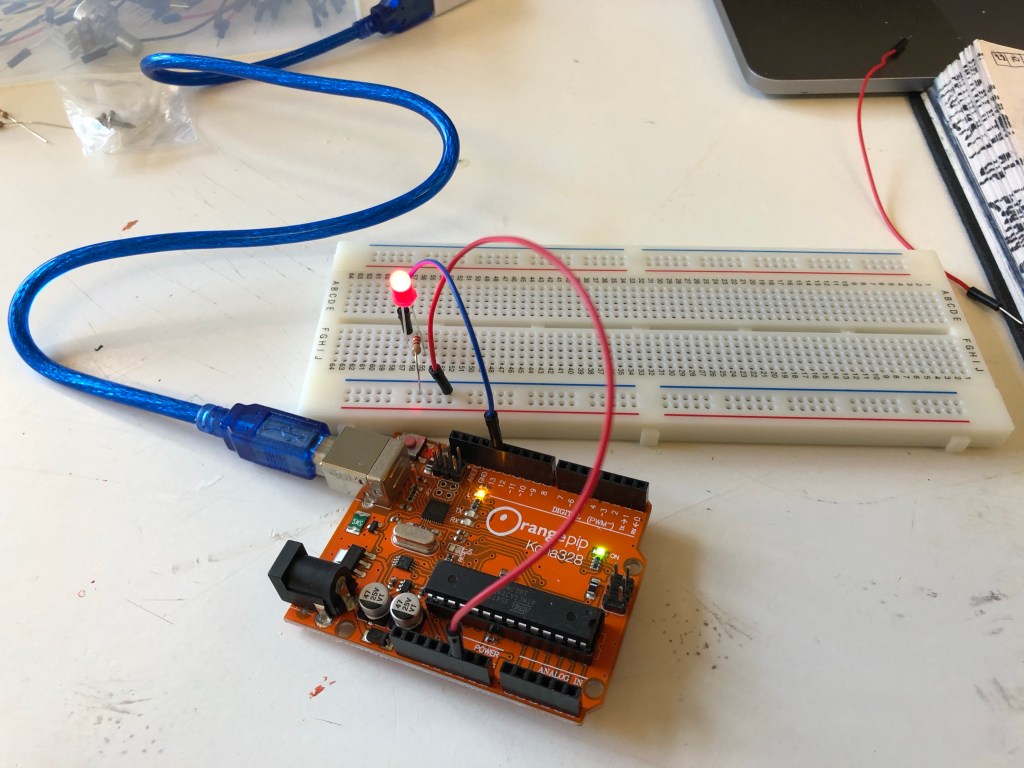
For this project, I intend to use professional CAD software to create intricate models based on my designs, during this I expect to gain and develop experience in CAD software, this could be very useful in my practice in designing and making, could look good on my C.V and would put my 3D printer to good use.

Marketing and Audiences

If I were to sell these models for profit, I would advertise and sell them on my website, while also including a “commissions” page where customers can request what they want to be 3D printed, if they wanted to, it could fit the theme of Da Vinci style designs (note: again, these Da Vinci models are more for show rather than function), or any kind of model they want.

The best way to get more customers to ask what they want (in terms of commissions) is by showing them what you can give them by producing and selling well designed and good quality prints as a way of getting more unique requests. The commissions page would have a text box that will go directly to my email, the customer would then type their request, the size they want they model to be and even hand drawn or digital designs and I would respond as soon as possible to let them know when they might be done as soon as possible.

The target audience for my work is anyone of any age who admires both the work and influence of Leonardo Da Vinci and those who love the idea of interpretations of both an artist’s work and the technology we know to this day, opening a fantasy collection of Da Vinci style pieces, made to look like he made and designed them. This is just a fun expansion on what I and a lot of people like, like my last project, when I built my second artefact, I was going for a direction of my model either being an ambitious model that explored my interest or a collectable and display model product that could be sold to many who share my interests in Da Vinci and fiction.

My Statement of Intent for Exhibition

This is my statement of intent of what I will be doing for my final project for the first five months of the new year in terms of research, context and craft.

My Idea

My idea is to create an exhibition displaying my 3D printed, Hand-crafted dioramas (with the pieces suspended on rods on a board of wood) based on my Leonardo Da Vinci style schematics of Movie props and common everyday appliances, each piece will be displayed on its own with its own description and final sketch in the style of Da Vinci’s work.

The Items I have chosen so far are:

  • A light saber (Star Wars)
  • The Flux Capacitor (Back to The Future)
  • A Pin hole camera
  • Desk Lamp
  • Type writer

E.D.G.E

Ethical– My project will involve CAD design, 3D printing and model making, all of these would make good practice in development in CAD and potentially starting my own commision business in selling 3D models to anyone who requests them, these models could be inventions, appliances, toys or models, so I believe that this project will be my guide into more of an understanding into the world of model making and business.

Digital– During the bowl and secondary artefact portion of the project, I was given the opportunity to expand more on my CAD skills and begin building bigger projects, this form of CAD is a step up from just placing small cubes into a pattern like my last major CAD project.

Global– During the months of first term, a few of my classmates have requested me to personally 3D print a model for their project (and some I’ve even offered), a very good idea to get the word out is by sending out a post on Facebook and Instagram, letting people know that I’m available to 3D print model for them at a price, not as much as commissions, but more as a 3D printer for hire, since I’ll request them to create the files themselves, due to me not having enough experience.

Entrepreneurial– With owning my own 3D printer and learning basic CAD skills, this style of craft opens up a lot of business opportunities, including starting up a commision business that involves creating and printing CAD files or even printing out CAD files created by my customers who request them, for example I’ve already had a few of my classmates request me to print for them for a small price.

Timeline

Each month will break down into a strategy that will start with research and practice and will slowly build up to my final model and design for my degree show.

January

  • Research in CAD- This will involve me doing extensive research about CAD design and quick tricks I could learn and how to operate professional industry standard (and possibly complex) CAD programs
  • Context- For this, I will be sketching many ideas for Da Vinci style ideas and writing about their functions
  • Reading and research on Da Vinci’s inventions as well as other forms of craft.

Reading Material:

  • Leonardo Da Vinci: Extraordinary Machines
  • Things Come apart 2.0: A teardown manual for modern living

February

  • CAD Development- learning to use more professional CAD software and continuously applying what I know and what I will learn
  • Incorporating designs into digital construction to learn the limitations of both the CAD software and what can be possible to put together.

March

  • I will be printing many prototypes of a variety of main and alternate designs for the project
  • Testing the prototypes for quality and possibly assembling and functionality

April

  • I will begin CAD work, printing and decorating the final models and writing up their descriptions
  • I will visualise and plan out where my exhibition will be and what the layout will be

May

  • Last finishing touches
  • Setting up my exhibition

My Evaluative Statement

Evaluation of the Bowl project

When I started planning out my bowl project, I knew instantly how I was going to do it, for my bowl, I wanted to give it a unique feature (seeing as how the theme for my project was collaboration). So I thought about using magnets again just like in my last project, so I came up with the idea of creating a bowl that could split in half, this would act as a visual representation of two of my Gesamt kunstwerk ideas and concepts coming together as one. During this first project I experimented with a variety of design ideas including a four piece split and using a 3D pen to create 3D elements.

After printing out a total of five prototypes, I settled on using one simple design of making a bowl that split into two magnetic parts that could also be used as shelves for fridges as well as other magnetic surfaces.

As for the decorative design, I would paint each piece in their own unique design based on which two Pecha Kucha designs, I decided to combine together. For this one, I did a pixelated portrait of myself and New York landmarks. When the pieces connect together it forms another painting on the inside of the bowl of a pixelated statue of Liberty as a visual way of two worlds coming together.

Evaluation of the Secondary artefact

For my Secondary artefact, I still wanted to keep the theme of collaboration going, so I decided to bring in a design I drew back when I made my Pecha Kucha, my design was a Leonardo Da vinci style schematic I drew showing the design of a lightsaber, (and one showing the flux capacitor, both sketches can be found on my sketches blog post) so I wanted to take this idea a step further by adapting the sketch as a 3D diorama showing all the pieces laid out and stylized in a steampunk look, This would give it a Da Vinci style appearance using the limited amount of resources he had given the time period. The context behind this is to create a fantasy collection of Da Vinci themed dioramas paying tribute to pop culture.

More context can be found on my secondary artefact post on my blog.

My Technology Study Group

From the 22nd of October to the 5th of November, I attended a weekly study group in technology, during this we were all learning how to program and operate an arduino, which is a small circuit board that can be plugged into and programmed by a computer and using a series of wires to transmit the program from my computer to the arduino to the breadboard.

October 22nd

My first lesson was about lighting LEDs by connects an LED, a resistor and wires to the arduino and the bread board, for this I learned how to turn on the LED and program for how long it would blink and how bright it would shine.

First I’d open up arduino on my computer and open option “blink” under sketch, in this I had to program what brightness I wanted the light to be and select the timing on how long it would blink for.

The second part of the induction was adding the button to the breadboard, this would then allow me to turn the light on and off

October 29th

The second induction introduced me to these mini servos (which were little fans), for this one we were told how to set up the timer for how we wanted them to move and at what speed.

For me I set mine to move half way across and reset, potentially this could be used as a timer for jobs or activities like a board game or a toothbrush timer.

November 5th

My third and final session involved using pixel lights (each light contains a microprocessor), with these we could program any colour we want into it, the basic ones were green, blue and red, to change the colors, we had to set the numbers either higher or lower, this would then mix the colours together.

Conclusion

In conclusion, I enjoyed this study group, it gave an opportunity into basic programming and technology, there were a lot of detail and names I struggled to remember, and I couldn’t fully understand the coding, but I belive I give myself a few self taught lessons in learning patterns and rules (if I want to, if it feels necessary), I should get a better understanding of everything, which could potentially open my mind and give me ideas for future ideas.

Did/will this play a part in my main subject work?

When choosing this study group, I had no intentions of adding technology to my bowl or secondary artefact, I wanted my bowl just to be simple, I chose this group just so I could learn basic programming, however I am glad I chose this one, even though it was a bit complicated to remember the scripting and the wires, it was good to step out my comfort zone and potentially I could see myself buying my own arduino kit so I can get a lot more practice and get a better understanding on the patterns and coding.

Sketches

Here are my sketches for my bowl project as well as my secondary artefact and my ideas for future models.

The Bowl:

Seconday Artefact:

For my Da vinci style design on the lightsaber, rather then writing in backwards italian, I decided to wriute in the fictional Star wars language know as Basic.

Here is the Galactic Basic Alphabet:

Here are the translations:

  • “Kyber crystal” (Top centre)
  • “When chosen by a jedi, it turns blue or green, when chosen by a sith it turns red” (Below)

Future Model Designs:

Note: For some of these Da Vinci style drawings, (except for the light saber) I wanted to write it in the unique way Da vinci wrote notes on his sketches by writting them in italian backwards, So for the Flux capacitor, I googled the drawing from the movie and copyied the writting and equasion, translated them to italian on Google translate and did my best to write backwards, similarly to how he wrote it.

The drawing used in the movie (Back to the future 1985)

Here are some of the quotes I translated to Italian:

  • “The Flux Capacitor” (Top right corner)
  • “It’s what makes time travel possible” (Top-bottom right corner)
  • “Caution: Sheild eyes from light” (bottom right corner)

Pinhole Camera:

One of my non movie prop Ideas is to create a Da Vinci style pinhole camera and experiement various types of way that it will operate, such creating a big slider for the pin hole, using reusabel matches or possibly creating a remote control prototype.

When I begin my research, I will intend to read a book on Leonardo Da Vinci’s inventions to get more ideas on what I could make.