Here is a collection of all the 3D printed pixel models I have made for my Final year projects,
Most of these are designs I found on the internet, some are of my own characters and designs, here are some links to the designs I found on the internet:
For my final year project, I decided to expand on a particular element for my foundation project from 2018.
What I did was make a 3-D printed pixel model of me, that I designed, printed and hand-painted (as part of an alphabetical set of models of me, relating to 26 art movements, e.gA =abstract, B=Bauhaus, C= Cubism, in this case, P was for Pixelation) so with that, I saw an opportunity to design and create more of these models to display or even sell them as merchandise.
Making Process
The first step is drawing the design, (The designs are based on fanart creations of 8bit Megaman graphics styled characters from movies, tv shows and other videogames) the best way to draw the designs and keep the square count consistent, I bought a square paper notebook to draw the design.
(Note: The numbers on the edges help me keep track of how squares are used and could even be used to tell apart or create different templates).
When creating my own designs I would often use inspiration from other designs this is so I can keep the design consistent with the other. (depending on the character’s body build, accessories or pose, the square ratio may vary)
CAD design
The next step is to translate the design on to Tinker cad, I first start by arranging the squares in the right place (I use the square note pad design as instructions, I make sure to colour coordinate to tell the difference and to get a preview before printing (even though it comes out in plain white).
Once the design is finished, I would then export it into an STL file and import it into Prusa slicer for preparation and slicing, once I set the model(s) to a 60-degree angle ( in order for it to come out the way I want it), after that, I would slice (add supports) and export it in a USB.
Next step is setting up the printer, first I would pour the right quantities of liquid resin in the tank, then I’d select the file from the USB, (the printer I have is resin-based and uses ultraviolet technology), so once the metal plate lowers down and sinks into the resin, the ultraviolet light then arranges which part goes where thus sculpting it in place
After a few hours (depending on how big the design is or how many I’ve made at once) I then remove the metal print platform, I’d then scrape off the print and cut off the excess plastic, next I would then wash the print using isopropanol (or nail polish remover), once cleaned I would then placed the model(s) into the washer to dry and cure.
Painting
Next, I’d take the model(s) and paint them, I’d first start by drawing the grid of small squares to help arrange which colours go where, like a jigsaw puzzle, I’d start with the outer line, that way I would draw distinctive lines indicating which colours go which (depending on the design), I would then outline the coloured shapes with a pen to help them stand out.
After that, the model(s) is finished.
Designs
For this year, the theme I chose to go with for these models is a superhero theme (as well as other icons of tv, film or video games)
The designs for theses characters are based on ones I found on the internet, where they created Megaman style looks for many icons of comics, movie, tv and videogames.
I used these designs to help count how many squares there are per length (particularly the ones that have a grid background, to make counting easier) and draw them out in my square paper book, I would then use the drawings as instructions when designing on tinker cad
Ideas
This project does have a few business opportunities and ideas of what they could be sold as and who they can be sold to and how they can be sold.
Key chains
Way back when I made my original model from 2018, I had a side idea for this pixel model idea, not only could it be apart of my art collection exhibit, but it could also be used as a souvenir, either a desk knick-knack or a keychain (because when I created the original model, I intentionally gave it a key chain hole, so it could also be used for someone’s keys or backpack), for example, I had a friend, who liked my model so much, that I decided to create an exact copy for her to keep as a key chain.
Another idea, I’ve included with my prototype models is I’ve managed to find a way to make them both key chains and deskc knick-knacks by gluing on 3mm x 0.5mm magnets to the bottom of the feet and on a bottle cap. Anothet idea I could do for the magnets, would be to print accessories to attach to the characters. (e.g guns, lightsabers, swords etc)
This is a basic idea of what kind of merchandise I could use these designs for and base on what they like, this Leeds to another possibility
Customised commissions
Aside from the comic book, movie and videogame designs I found and copied off the internet, I also created my own unique designs based on me and my own made-up superheroes, this gave me the idea to design and create commissioned models based on customer or friend request, with this I could make anyone for anyone, (possibly try different forms of 8bit, such as Mario Bros, the legend of Zelda or even 16-bit designs)
Another idea (if possible) would be to create a camera filter (on my website) that transforms a picture of someone into an 8bit form (with the possibility of customizing options, e.g clothing, accessories, facial features etc), once they submit the design they want, I would then create on CAD, print them, paint them and have them sent to the buyer.
Check out the making process video on my Youtube channel:
For my final BAMS design and idea I’ve picked certain aspects from Edward D Wood Jr’s movies, My final design choice was this:
The design is based on his movie “Plan 9 from out space”, particularly the scene when flying saucers are flying around Los Angeles.
There is also another design I sculpted and cast, this one was based on the poster for ‘Glen or Glenda’
The reason I chose these two particular designs is that both these movies Ed Wood made had a big connection to him.
Glen or Glenda
Glen or Glenda was basically about a man transitioning into woman, the reason he wrote, directed and starred in this movie was because in his free time he liked to dress in women’s clothing, this wasn’t because he himself was transgender, it was because he liked it, so he knew what it was like to keep such a big secret from everyone, so he wanted to capture that into his movie to give people a sense of someone having a duel identity.
Plan 9 from outer space
Way before this movie was made, Ed Wood met and befriended famous Hollywood legend Bella Lugosi, (who is most famous for playing Dracula in the 1931 movie of the same name) for years Ed wood got him to appear in a few in his movies such as Glen or Glenda and Bride of the monster, he agreed to star in these was because he left Hollywood studios due to being blacklisted, meaning he had no choice but to accept every part and script he was given and because of this he didn’t want to sell out, so whenever Wood offered him a part in his movies, he’d say yes, but this time by choice.
A few years before Plan 9 was made Lugosi and Wood filmed footage of Lugosi picking flowers and mourning, this wasn’t really scripted or plan for anything, Ed Wood then wrote the script to accommodate all the footage shot in a cemetery. In 1956, Lugosi passed away at the age of 73, so when Plan 9 was made, Wood wanted to include this piece of footage of Lugosi to pay tribute to his friend.
Conclusion
Even though he wasn’t a brilliant filmmaker, his motivation and perseverance was impressive, his work was laughed at and unappreciated but he didn’t care, one of his movies Plan 9 From outer space is considered to be one of the worst movies of all time, but to him, it was his pride and joy, so this project isn’t about ripping into his work or expressing my own personal opinions about it, it’s about admiring someone did what he enjoyed doing for a living and honouring his memory, for him it didn’t matter that no one liked his work, the work was his and was something to be proud of, and what’s also impressive is that he wasn’t alone, he had a bunch of friends and even a few celebrities to help him out by either acting or working behind the scenes, they didn’t care if the movies were bad, they just wanted to help support his passion, just like I want to support and honour his legacy.
On the 23rd of May, I filmed the head stomp scene for my movie, to achieve this I needed:
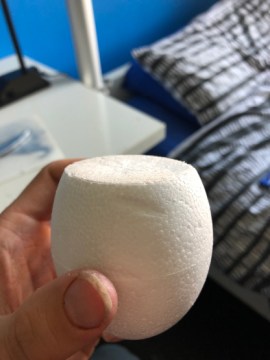
A styrofoam head
Water balloons (filled with fake blood)
liquid latex
makeup foundation
a wig
The Head
First I used a hot wire cutter to cut a piece off the back of the styrofoam head and hollowed out the inside and separate piece.
Then I fit the water balloons inside the head and taped the head cap on, then applied liquid latex on the head to smoothen out the surface then I applied makeup foundation to make it lifelike and applied the wig on top.
Filming the scene
Once we filmed the scenes of our actor before the effect happens, we then switched it around and put the head on the body of my stunt dummy wearing the sweater and wig, once it was all in position I proceeded to stomp on the head, it was successful, though there wasn’t as much blood spatter as I was expecting, however, I was happy with the effect.
Note: In case the effect goes wrong in possible future projects, the best thing would be to create spares as backup.
On the 15th of May, I started filming the hole in the hole in the chest effect for my movie, top achieve this I need:
Green card
a long Cardboard box
A couple of grocery bags and a black trash bag
Fake blood
Red paint
The Hole
First I took the Grocery bags and trash bags, cut them up, twisted them and hot glued them inside the walls of the box, next I painted the front row in red and the at back I glued the trash bag (this was to create depth).
The Effect
For the effect I had my friend Emma volunteer, first I cut out the shape of the hole open a piece of green card and taped it to her chest, next I filmed her pretending to have a hole in her chest and acting all shocked. Next, I took the hole and very carefully placed it in the same positio0jn Emma was standing and the green shape was. Once I recorded I was able what I needed I then placed it on my editing software and chromakey I was able to replace the green shape with the hole.
Note: At first I did struggle to aline the two together but in the end, I managed to do a decent job, not perfect but it could’ve been worse.
On the 15th of May, I started filming the heart rip effect for my movie, To achieve this effect I needed:
A pillow
An old shirt to ruin
An old container
Tin foil
Fake blood
A Potato
A balloon
The Heart
For the heart, I took a potato and cut it into a heart shape and fit it into a balloon and glued it shut.
Building the Torso
First I took the container, traced it onto a pillow, then cut it open and removed unwanted stuffing, then filled the container with fake blood and the heart and then cover the top of the container with the foil, to film this effect, I hung the pillow up (while it was wearing the shirt) using a long piece of wire and held it in place.
To film this scene I set up the shot with my actor (Emma) wearing the old shirt and made it look like she was going to have her heart ripped out, then before we switch the actor with the pillow, I filmed a shot of sam about to reach in, then we switched to the pillow and I let Sam shove his hand in to find the heart and pull it out after blending in edit the effect was pretty effective (no pun intended).
On the 25th of March, I started work on the throat-slitting effect
Shopping List:
2 Litre bottle
Clay
Plaster of Paris
Liquid Latex
Heat shrink tubing
Fake Blood
Plastic Syringe
To make the mold I took the 2-liter bottle and drew the shape of the appliance in the center, next I took some clay and sculpted a barrier around the shape, next I mixed up the plaster with water, for the first layer I applied a thin bit of plaster, then I let the rest drizzle on the sides.
Once the plaster was dry I removed the clay and the plaster was dry, I removed the clay and the plaster created the mold exactly the way I wanted it.
The Appliance
Next, I took the mold and started applying the latex, I started by applying a thin first layer until it dried I repeated this 7 more times and waited 15 minutes between each layer. Once all 8 layers were dry I peeled off the appliance using baby powder.
The Effect
To prepare the effect, I flattened down a piece of heat shrink tubing, sealed one of the ends and cut a line by the seal (this is were the blood actually come out of), next I attached the heat shrink to my neck using liquid latex (to dry it quickly I used a heat gun and at a distance tried not to burn my self), once the tubing was applied I then added on the appliance with more latex to help it blend in, after drying it with a heat gun I then applied some flesh tone make up foundation to help it blend with my skin color, next I filled a plastic syringe with fake blood and connected it to the tubing. To film the effect the timing had to be right, so when I’d drag the fake knife across my neck I’d pushed down on the syringe so the blood pours out at the right time. It was a decent success, the problems were the timing and the thickness of the blood, the next time I tried for the actual movie I watered the blood down a little bit more.
Note: In order to improve the quicker blood flow, I had to keep the tubing straight to prevent leaks and blockage, before filming the actual scene I tested it out on a stunt dummy I built and used water, this proved to be helpful, so when we finally filmed the scene it was successful.
For my movie, I also created prop weapons to include with the effect and display at my end of the year show.
The knife
A plastic knife
Plasticine
Silicone
Jesmonite Part A and B with metal powder
Black and silver spray paint
To make the knife I took some plasticine (enough to fit the size of the knife) and pressed the knife against it so it covers half of it, next I took a sheet of metal and covered the sides and secured it in place, Next, I mixed up the silicone and poured it onto the knife. After 24 hours I turned the mold over and covered the other side in silicone, After another 24 hours I then removed the plastic knife, then I set up the two-part mold by cutting a funnel shape at the top, then after suspending the two pieces together I mixed up the Jesmonite and powder and poured it into the mold, after 20 minutes I took the knife out of the mold, finally I added finishing touches By spray painting the blade silver and the handle black.
The Hatchet
A foam hatchet
Silicone
A piece of scrap wood
Wood Varnish
Jesmonite Part A and B with metal powder
Black and silver spray paint
To make the hatchet I first started by tracing the handle of the foam hatchet onto a piece of scrap wood, then I cut it out on the bandsaw and sanded the edges to create the curves and applied dark brown wood varnish to match the original. To make the blade I took some small pieces of scrap wood tall enough to cover the blade and secured them in place, once I got it to the right position I wanted I then mixed up the silicone and poured it into the box after waiting for 24 hours I removed the mold cut parts of the back and top in order to wiggle it out, once I secured it again I mixed up the jesmonite and poured it into the mold, after waiting 20 minutes I pulled the blade out cut off any unwanted bits, Next I drilled a hole at the top of the handle and the bottom of the blade, after spray painting the blade black and silver I took a small wooden dowel and fit it in between each socket and after adding a bit of glue into the sockets and dowel the axe was complete.
The grenade
A styrofoam Easter egg
Foam core poster board
Tissue paper
Green and black acrylic paint
A thin piece of metal
A plastic bottle
A key ring
A piece of wire
Hot glue gun
To make the grenade I took the easter egg and cut a bit of the top off, then I drew a bunch of small squares on the poster board, cut them out and hot glued them around the egg and I cut out a circular piece of poster board to glue on the bottom to help it stand on its own, Next I cut the top part of the plastic bottle and glued it to the top, then I drilled a small hole at the top, next I covered the egg with PVA glue and tissue paper, once it dried I spray painted the whole thing silver, after that I took the thin piece of metal and cut it to look like the safety lever and hot glued it to the bottle cap, then I painted the main grenade in dark green, for finishing touches I took a piece of wire and a key ring, bent the wire in a small circle around the key ring and spot welded it in place and cut the wire, this acted as the grenades safety pin.
On the 28th of May, I started work on the eye rip effect, for this effect I needed:
A Styrofoam head
A lump of clay
Liquid Latex
Fountain make up
Black paint
A small plastic bag filled with “blood”
A small stone
A piece of string
The Eye
For the eye, I took a piece of clay and rolled it up into a ball, then I glued a piece of string to the back, next I spray painted the ball white and hand painted the eye details and painted the string red.
The Head
For the head, I used a hot wire cutter to cut a piece from the back, then hollowed out the inside and the separate piece(to fit the plastic bag inside), then I cut a hole in the right eye deep enough for it to reach through. To help the blood pour out correctly, I took a lump of clay and made a curve to make sure it was going out the right way.
Before setting up the eye, I covered the head in a few layers of liquid latex to smoothen out the surface, after that, I applied foundation make up all over the head, finishing touches were painting on the facial hair to match the actor.
For the rig, I poked a hole in the bag, fed the string through and tied the stone inside, then I placed the eye in the right position and closed up the head.
Once we got into position I had Sam rip the eye out, the final result wasn’t what I had intended since the whole bag ended up being pulled out and the stone didn’t tear the bag completely, however, I believe the effect went well never the less, the best idea in future always have spare heads in case anything goes wrong
Note:
This effect was originally supposed to be an eye stab effect, but due to a few failed attempts I divided to go with something similar and have my own idea on how to pull it off
(The original idea came from watching a BFX tutorial)
*This effect can be dangerous, if not done properly*
For the neck snap, all I had to do was have the victim (Sam) ready in position, next, I’d come up from behind. place my hands on the top of his head and chin and get ready to twist his head, however, I’m NOT the one who’s turning the head it’s the actor, if done correctly at the right speed the effect can look pretty realistic (the final touch is a gruesome and realistic sound effect and you are done).
Face Slash
To prepare for the face slash effect, we did a few practice shots by using water and I got ready in position, what we did was I had Sam holding the hatchet and as soon as he swung it in front of my face I spat out the water, once we got the rhythm and were happy with it, I then had a mouth full of “blood”, filmed it and I was satisfied.