Desk Inventory

For this assignment, I’ll be conducting an inventory of my studio space based on its sensory stimuli and for each encounter, I’ll be writing from a number of perspectives.

Sight – I see my equipment, my models, my desk calendar, my postcards, my water flask, my spray paint cans, My inventory box, etc. Sometimes my desk is cluttered with tools and materials (depending on the project) such as clay, cardboard cuttings, my pens, pencils, craft knives, paper and whichever project(s) I’m working on

  • My models – On the shelf on my desk I have three raku clay models, a little statue and one 3D printed figurine.
  • My Inventory box-  The inventory box is a small wooden box I once made from wood induction last year, the box is smooth and the texture of it is slightly burned for decoration, on top is a pewter casted Avengers logo superglued on and inside the box it contains multiple tools and miscellaneous things such as pencils, paints, erasers, paperclips and a ball of string
  • My postcards- Each of my postcards are from multiple museums, each one based on an art piece
  • My Name signs – There are two models of my name, one of them I made out of coffee sticks, string, and hot glue and the other I made out of clay and glazed it green

Touch – Each item has its own unique touch, many of them feel smooth, others have a rough texture and other

  • The Clay Models- The clay models (when finished, unfinished or glazed) can feel cold, and if not handled with care, could break, the raku models have a slightly rough feel to them
  • My Notebooks – There are my three notebooks, my current one and my two old ones, each of them are customized, each one with a volume number, indicating which one was used in order, each page is filled handwritten notes, annotations, and sketches, some of the writing and sketching roughly written/drawn in, sometimes you can feel the pressure from pen go through the pages to the other.
  • My Inventory box- when opened it hold various tools and miscellaneous items, the box is smooth and the texture of it is slightly burned for decoration, on the front is a small hook lock on a hinge, on top is a pewter casted Avengers logo superglued on. The edges have also been carved.


Sound – Each item has it’s own unique sound, some are quiet and unnoticeable some are pretty distinctive

  • The Spraypaint cans- the spraypaint cans make a rattling sound when shaken
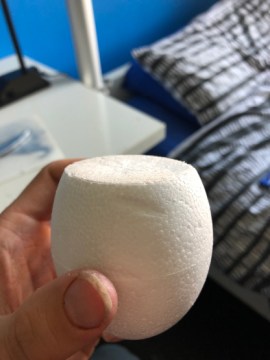
  • My Clay/plaster models- if one of my clay or plaster models were to break the sound of them smashing sound like glass. and some of them have a hollow sound, and if the plaster were to be stretched, it would create a creaking noise
  • The hinges on my inventory box squeak when opened

Smell – Each item has it’s own smell

  • My Inventory box has a faint but noticeable smell of burning wood, like burnt cardboard my clay models don’t have much smell to them
  • My plaster hand that I made last year still has traces of baby powder, from when I was using  it for latex tests, the baby powder smells sweet, like strawberries


Term Project Choices

For this term, I and my group were introduced to multiple term choices to focus on for 5 weeks. These included……..

British Art Medal Society (B.A.M.S)

This course (as the name suggests) is about researching and making our own medals, which will include learning to bronze cast, the theme can be anything of our choice, and by the end of the five-week term, our medals will be displayed and prizes could be won. It will be a good opportunity to create a small artifact in a new museum.

There will also be a prize for anyone who bases his/her medal(s) on endangered animals


Pewter

This project will involve creating our own unique piece or pieces of high-quality jewelry made out of pewter, (if not entirely, at least 50%) Our pieces will be judged and will be considered for the quality, originality, and suitability for the purpose of marketability of the submission.


St Fagans: Referencing Tradition

This project working with the people at St Fagan’s and assisting a collection through re-interpretation, re-visionining, and making. This will involve choosing an artifact from everyday lives and finding out who owned these pieces and in which ways they contain traces and evidence of there use in use in history.

Liberty Live Brief: Book

This project will involve creating our own book (out of a sheet of A2 paper) which explores this heritage and should be sympathetic to the information and content within. There will also be research involved in stone carved hieroglyphics, handwritten manuscripts on parchment or print on paper.


Craft in the Bay: Curation and Showcase

This project will involve creating a proposal for a themed group show and each student will receive a series of group tutorials that address the themes, needs, and practicalities of curating a show. This course requires good organization, facilitation, and understanding of the contemporary practice and it’ll also require research of contemporary venues, audience participation, digital, pop up and site-specific contexts.


MADE.COM: TALENT LAB

This project will involve designing our own furniture for Talent lab, which his a crowdfunding site that helps raise funds to build your designs.


Head stomp Effect

On the 23rd of May, I filmed the head stomp scene for my movie, to achieve this I needed:

  • A styrofoam head
  • Water balloons (filled with fake blood)
  • liquid latex
  • makeup foundation
  • a wig

The Head

First I used a hot wire cutter to cut a piece off the back of the styrofoam head and hollowed out the inside and separate piece.

Then I fit the water balloons inside the head and taped the head cap on, then applied liquid latex on the head to smoothen out the surface then I applied makeup foundation to make it lifelike and applied the wig on top.

Filming the scene

Once we filmed the scenes of our actor before the effect happens, we then switched it around and put the head on the body of my stunt dummy wearing the sweater and wig, once it was all in position I proceeded to stomp on the head, it was successful, though there wasn’t as much blood spatter as I was expecting, however, I was happy with the effect.


Note: In case the effect goes wrong in possible future projects, the best thing would be to create spares as backup.


The Hole in the chest effect

On the 15th of May, I started filming the hole in the hole in the chest effect for my movie, top achieve this I need:

  • Green card
  • a long Cardboard box
  • A couple of grocery bags and a black trash bag
  • Fake blood
  • Red paint

The Hole

First I took the Grocery bags and trash bags, cut them up, twisted them and hot glued them inside the walls of the box, next I painted the front row in red and the at back I glued the trash bag (this was to create depth).

The Effect

For the effect I had my friend Emma volunteer, first I cut out the shape of the hole open a piece of green card and taped it to her chest, next I filmed her pretending to have a hole in her chest and acting all shocked. Next, I took the hole and very carefully placed it in the same positio0jn Emma was standing and the green shape was. Once I recorded I was able what I needed I then placed it on my editing software and chromakey I was able to replace the green shape with the hole.

IMG_7213.jpgIMG_7214.jpg

Note: At first I did struggle to aline the two together but in the end, I managed to do a decent job, not perfect but it could’ve been worse.


Heart rip effect

On the 15th of May, I started filming the heart rip effect for my movie, To achieve this effect I needed:

  • A pillow
  • An old shirt to ruin
  • An old container
  • Tin foil
  • Fake blood
  • A Potato
  • A balloon

The Heart 

For the heart, I took a potato and cut it into a heart shape and fit it into a balloon and glued it shut.

Building the Torso

First I took the container, traced it onto a pillow, then cut it open and removed unwanted stuffing, then filled the container with fake blood and the heart and then cover the top of the container with the foil, to film this effect, I hung the pillow up (while it was wearing the shirt) using a long piece of wire and held it in place.

IMG_6582 2.JPG

To film this scene I set up the shot with my actor (Emma) wearing the old shirt and made it look like she was going to have her heart ripped out, then before we switch the actor with the pillow, I filmed a shot of sam about to reach in, then we switched to the pillow and I let Sam shove his hand in to find the heart and pull it out after blending in edit the effect was pretty effective (no pun intended).

The Throat Slitting Effect

On the 25th of March, I started work on the throat-slitting effect

Shopping List:

  • 2 Litre bottle
  • Clay
  • Plaster of Paris
  • Liquid Latex
  • Heat shrink tubing
  • Fake Blood
  • Plastic Syringe

To make the mold I took the 2-liter bottle and drew the shape of the appliance in the center, next I took some clay and sculpted a barrier around the shape, next I mixed up the plaster with water, for the first layer I applied a thin bit of plaster, then I let the rest drizzle on the sides.

Once the plaster was dry I removed the clay and the plaster was dry, I removed the clay and the plaster created the mold exactly the way I wanted it.

IMG_5812.JPG

The Appliance

Next, I took the mold and started applying the latex, I started by applying a thin first layer until it dried I repeated this 7 more times and waited 15 minutes between each layer. Once all 8 layers were dry I peeled off the appliance using baby powder.


The Effect

To prepare the effect, I flattened down a piece of heat shrink tubing, sealed one of the ends and cut a line by the seal (this is were the blood actually come out of), next I attached the heat shrink to my neck using liquid latex (to dry it quickly I used a heat gun and at a distance tried not to burn my self), once the tubing was applied I then added on the appliance with more latex to help it blend in, after drying it with a heat gun I then applied some flesh tone make up foundation to help it blend with my skin color, next I filled a plastic syringe with fake blood and connected it to the tubing. To film the effect the timing had to be right, so when I’d drag the fake knife across my neck I’d pushed down on the syringe so the blood pours out at the right time. It was a decent success, the problems were the timing and the thickness of the blood, the next time I tried for the actual movie I watered the blood down a little bit more.


Note: In order to improve the quicker blood flow, I had to keep the tubing straight to prevent leaks and blockage, before filming the actual scene I tested it out on a stunt dummy I built and used water, this proved to be helpful, so when we finally filmed the scene it was successful.

The Weapons

For my movie, I also created prop weapons to include with the effect and display at my end of the year show.

The knife

  • A plastic knife
  • Plasticine
  • Silicone
  • Jesmonite Part A and B with metal powder
  • Black and silver spray paint

To make the knife I took some plasticine (enough to fit the size of the knife) and pressed the knife against it so it covers half of it, next I took a sheet of metal and covered the sides and secured it in place, Next, I mixed up the silicone and poured it onto the knife. After 24 hours I turned the mold over and covered the other side in silicone, After another 24 hours I then removed the plastic knife, then I set up the two-part mold by cutting a funnel shape at the top, then after suspending the two pieces together I mixed up the Jesmonite and powder and poured it into the mold, after 20 minutes I took the knife out of the mold, finally I added finishing touches By spray painting the blade silver and the handle black.

The Hatchet

  • A foam hatchet
  • Silicone
  • A piece of scrap wood
  • Wood Varnish
  • Jesmonite Part A and B with metal powder
  • Black and silver spray paint

To make the hatchet I first started by tracing the handle of the foam hatchet onto a piece of scrap wood, then I cut it out on the bandsaw and sanded the edges to create the curves and applied dark brown wood varnish to match the original. To make the blade I took some small pieces of scrap wood tall enough to cover the blade and secured them in place, once I got it to the right position I wanted I then mixed up the silicone and poured it into the box after waiting for 24 hours I removed the mold cut parts of the back and top in order to wiggle it out, once I secured it again I mixed up the jesmonite and poured it into the mold, after waiting 20 minutes I pulled the blade out cut off any unwanted bits, Next I drilled a hole at the top of the handle and the bottom of the blade, after spray painting the blade black and silver I took a small wooden dowel and fit it in between each socket and after adding a bit of glue into the sockets and dowel the axe was complete.

unknown.jpg

The grenade

  • A styrofoam Easter egg
  • Foam core poster board
  • Tissue paper
  • Green and black acrylic paint
  • A thin piece of metal
  • A plastic bottle
  • A key ring
  • A piece of wire
  • Hot glue gun

To make the grenade I took the easter egg and cut a bit of the top off, then I drew a bunch of small squares on the poster board, cut them out and hot glued them around the egg and I cut out a circular piece of poster board to glue on the bottom to help it stand on its own, Next I cut the top part of the plastic bottle and glued it to the top, then I drilled a small hole at the top, next I covered the egg with PVA glue and tissue paper, once it dried I spray painted the whole thing silver, after that I took the thin piece of metal and cut it to look like the safety lever and hot glued it to the bottle cap, then I painted the main grenade in dark green, for finishing touches I took a piece of wire and a key ring, bent the wire in a small circle around the key ring and spot welded it in place and cut the wire, this acted as the grenades safety pin.

img_6573.jpgimg_6711.jpg


The Eye Rip Effect

On the 28th of May, I started work on the eye rip effect, for this effect I needed:

  • A Styrofoam head
  • A lump of clay
  • Liquid Latex
  • Fountain make up
  • Black paint
  • A small plastic bag filled with “blood”
  • A small stone
  • A piece of string


The Eye

For the eye, I took a piece of clay and rolled it up into a ball, then I glued a piece of string to the back, next I spray painted the ball white and hand painted the eye details and painted the string red.

The Head

For the head, I used a hot wire cutter to cut a piece from the back, then hollowed out the inside and the separate piece(to fit the plastic bag inside), then I cut a hole in the right eye deep enough for it to reach through. To help the blood pour out correctly, I took a lump of clay and made a curve to make sure it was going out the right way.

img_7150-2.jpg

Before setting up the eye, I covered the head in a few layers of liquid latex to smoothen out the surface, after that, I applied foundation make up all over the head, finishing touches were painting on the facial hair to match the actor.

For the rig, I poked a hole in the bag, fed the string through and tied the stone inside, then I placed the eye in the right position and closed up the head.

Once we got into position I had Sam rip the eye out, the final result wasn’t what I had intended since the whole bag ended up being pulled out and the stone didn’t tear the bag completely, however, I believe the effect went well never the less, the best idea in future always have spare heads in case anything goes wrong

Note:

This effect was originally supposed to be an eye stab effect, but due to a few failed attempts I divided to go with something similar and have my own idea on how to pull it off

(The original idea came from watching a BFX tutorial)


Simple Effects

Neck Snap

Caution

*This effect can be dangerous, if not done properly*

For the neck snap, all I had to do was have the victim (Sam) ready in position, next, I’d come up from behind. place my hands on the top of his head and chin and get ready to twist his head, however, I’m NOT the one who’s turning the head it’s the actor, if done correctly at the right speed the effect can look pretty realistic (the final touch is a gruesome and realistic sound effect and you are done).


Face Slash

To prepare for the face slash effect, we did a few practice shots by using water and I got ready in position, what we did was I had Sam holding the hatchet and as soon as he swung it in front of my face I spat out the water, once we got the rhythm and were happy with it, I then had a mouth full of “blood”, filmed it and I was satisfied.


D.I.Y Fake Blood Recipe

1 small bowl of corn syrup

2 tbs of red food coloring

1 small drop of blue food coloring

1 small drop of chocolate syrup

1 small bowl of water


Knife Throw Effect

On the 26th of March, I started working on a knife being thrown into the head effect as part of my locus and movie project.

Shopping list:

  • Two plastic knives
  • Thin copper wire

With blood:

  • Plastic syringe
  • Tubing
  • Fake blood


The Knife

First I started by cutting one of the plastic knives in half and drilled a small hole at the top end of the blade, next I took the copper wire and hot glued the end of the wire to the end of the hole, next I bent the wire around my head and held it in place (using paper clips and covering my hair with a beanie).

The Test Video

  1. For the first shot, I had my friend Sam holding the knife without throwing it. So I had him look like he was about to throw it, then the camera quickly panned out to an empty space.


Screen Shot 2019-05-21 at 11.49.53.pngScreen Shot 2019-05-16 at 10.49.28.png

2. For the second shot, I had Sam make a similar move to the one from the previous shot, but without the knife, then he pretended to throw the knife and the camera panned to me wearing the wire knife, then I blended it all in editing.

Screen Shot 2019-05-21 at 12.03.01.pngIMG_6741.PNG

The Blood Version 

For the blood version, I took a plastic syringe and tubing and hot glued the tubing to the wire and attached the syringe (filled with fake blood) to the tubing, the result was pretty decent.

IMG_6555.PNG